一、创建SSL的阿帕奇网站
1.1 创建阿帕奇及开启阿帕奇
[root@server10 ~]# dnf -y install httpd			安装阿帕奇
[root@server10 ~]# systemctl enable httpd		设置阿帕奇开机启动
Created symlink /etc/systemd/system/multi-user.target.wants/httpd.service → /usr/lib/systemd/system/httpd.service.
1.2 安装安全套阶层协议
[root@server10 ~]# dnf -y install mod_ssl 安装安全套阶层协议1.3 创建私有目录及添加权限
[root@server10 ~]# mkdir /etc/ssl/private		创建私有目录
[root@server10 ~]#
[root@server10 ~]# chmod 700 /etc/ssl/private	将私有目录添加700权限
自建证书和密钥(这里是私有云,模拟公有云密钥。实际工作中购买公有云整数后会发密钥到邮箱中,用公有云证书密钥即可)
1.4 用openssl命令生成密钥和证书
[root@server10 ~]# openssl req -x509 -nodes -days 365 -newkey rsa:2048 -keyout /etc/ssl/private/apache-selfsigned.key -out /etc/ssl/certs/apache-selfsigned.crt
openssl req -x509 -nodes -days 365 -newkey rsa:2048 -keyout 用openssl命令生成密钥和证书,-x509证书的格式,-days 365有效期1年,rsa:2048密钥的加密算法,长度2048	/etc/ssl/private/apache-selfsigned.key -out /etc/ssl/certs/apache-selfsigned.crt	apache-selfsigned.key生成的密钥文件,apache-selfsigned.crt生成的证书文件


..+.........+..........+...+...+...........+++++++++++++++++++++++++++++++++++++++*.........+....+.................+.......+......+..+...+....+..+++++++++++++++++++++++++++++++++++++++*...............+....+.....+.............+.........+.....+......+.........+.+...+..+.........+...+.+.........+........+..........+..+.+..............+......+......

-----
Country Name (2 letter code) [XX]:CN		国家代号
State or Province Name (full name) []:BJ		省
Locality Name (eg, city) [Default City]:BJ		市
Organization Name (eg, company) [Default Company Ltd]:HUAWEI	公司名称
Organizational Unit Name (eg, section) []:IT	部门
Common Name (eg, your name or your server's hostname) []:lee		名
Email Address []:2823629811@qq.com		邮箱
1.5 生成dh参数
[root@server10 ~]# openssl dhparam -out /etc/ssl/certs/dhparam.pem 2048调用openssl工具生成dh参数,然后指定生成dh参数的文件路径1.6 查看密钥交换协议下的证书文件
[root@server10 ~]# cat /etc/ssl/certs/dhparam.pem | tee -a /etc/ssl/certs/apache-selfsigned.crt 查看密钥交换协议下的证书文件
-----BEGIN DH PARAMETERS----- 		信息都是加密的
MIIBDAKCAQEAwHFXrr5TytH6pq7u0vfMWgh8MEfRF/dPp3D77vK1I3Ki0XxWAZ0s
bD16h1bKm+q8qaGc+bR5Td0bzxPtX4tAWv7VuY0oJTiuLXi676WBUafr2d285Alg
hg051q9059AJ2X1pt5ynHDe20nXXIb0ytjJ9LHpknIaElwet8pTZjx9O5GH9LdKl
glQIFwkbrs5IeLdwtSmOcKnrCTEKhUIP8jLjcAaAFM7D+VsKmZCXFd/tJdWQRXeA
pw6vs3jBI+n0hKNv5cbyyPsT5DaK7wAf4cBnS+D16IFYNSwlPDQ96jX6vpL5pey4
zplNOtnoZa6kj7U4ywO/Cr2qfhLafJFVTwIBAgICAOE=
-----END DH PARAMETERS-----
1.7 编辑ssl的配置文件
[root@server10 ~]# vim /etc/httpd/conf.d/ssl.conf		#编辑ssl的配置文件
41 DocumentRoot "/www/itcloud.com"					#指定网站的目录
42 ServerName www.itcloud.com:443					#定义服务器的名称,必须加端口号443,443是https
86 SSLCertificateFile /etc/ssl/certs/apache-selfsigned.crt	#指定证书文件的位置
94 SSLCertificateKeyFile /etc/ssl/private/apache-selfsigned.key	#指定密钥文件的位置
1.8 创建网站的目录及测试页面
[root@server10 ~]# mkdir -pv /www/itcloud.com			创建网站的目录
mkdir: created directory '/www'
mkdir: created directory '/www/itcloud.com'
[root@server10 ~]#
[root@server10 ~]# cd /www/itcloud.com/				进入网站目录下
[root@server10 itcloud.com]#
[root@server10 itcloud.com]# echo "<h1>www.itcloud.com</h1>" > index.html		创建测试页面
1.9 创建无ssl虚拟主机的配置文件
[root@server10 ~]# vim /etc/httpd/conf.d/non-ssl.conf	创建无ssl虚拟主机的配置文件		(目的:重定向 不输https,只输ip会自动跳转)
<VirtualHost *:80>									#定义虚拟主机,端口号是80
 ServerName www.itcloud.com							#服务器的名称:www.itcloud.com
 Redirect "/" "https://www.itcloud.com/"					#由http://www.itcloud.com/ (80)重定向到https://www.itcloud.com/  (443)
</VirtualHost>
1.10 编辑阿帕奇的配置文件
[root@server10 ~]# vim /etc/httpd/conf/httpd.conf #编辑阿帕奇的配置文件100 ServerName www.itcloud.com:443 #定义服务器名称(把80改成443)
124 #DocumentRoot "/var/www/html" #注释掉阿帕奇默认网站的目录
129 <Directory "/www"> #自定义网站的目录1.11 检查阿帕奇配置文件的语法及重启阿帕奇
[root@server10 ~]# apachectl configtest		检查阿帕奇配置文件的语法
Syntax OK
[root@server10 ~]# systemctl restart httpd	重启阿帕奇
1.12 win11虚拟机上创建映射关系
快照还原win11虚拟机的新系统 8网卡

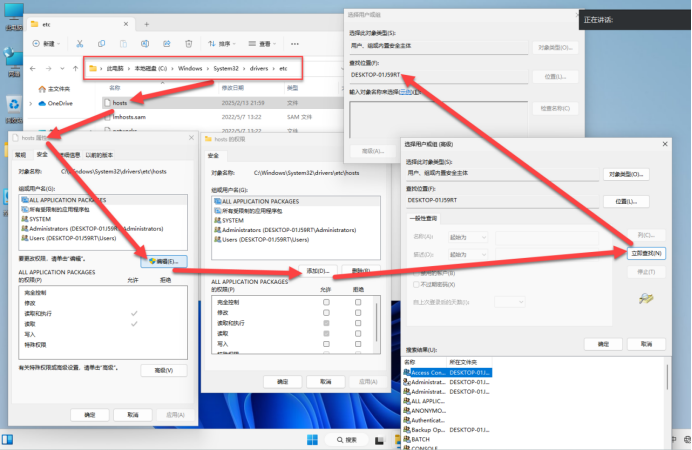
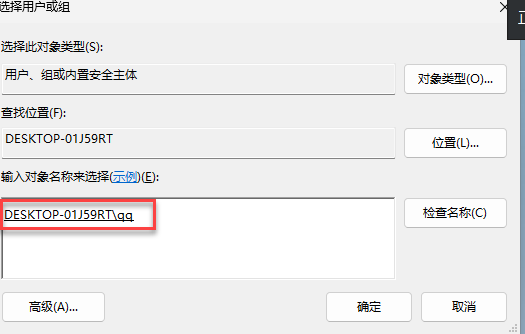
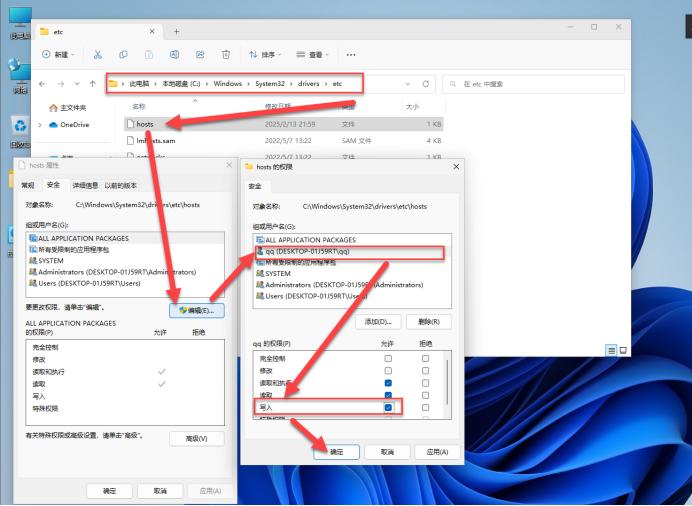
1.12.1 建立映射
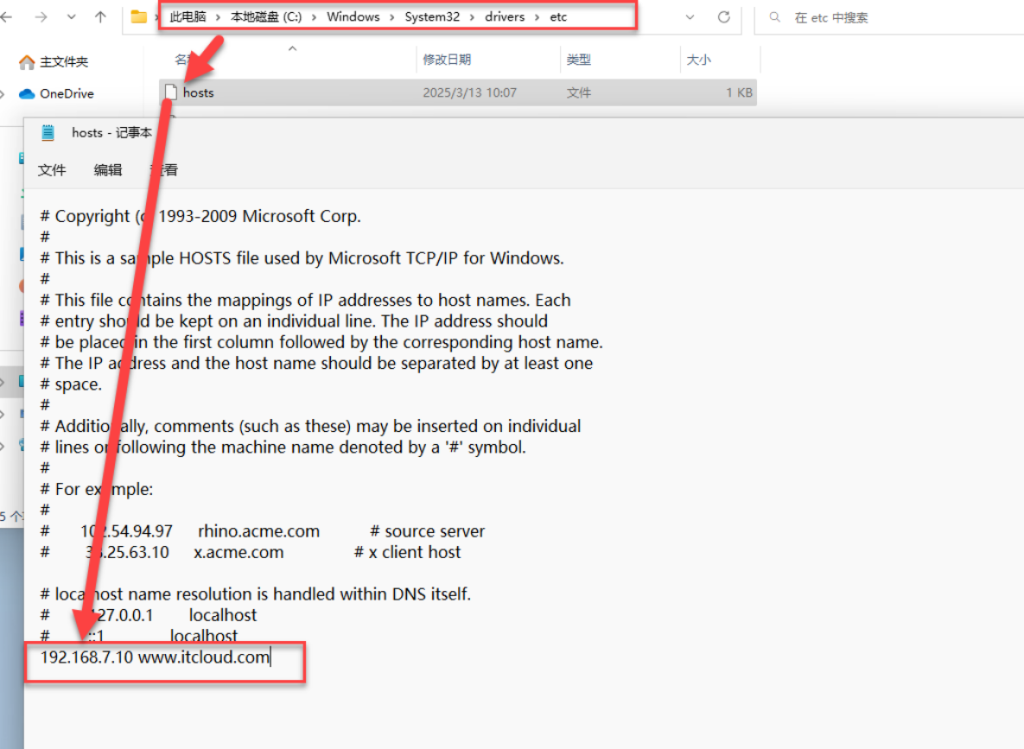
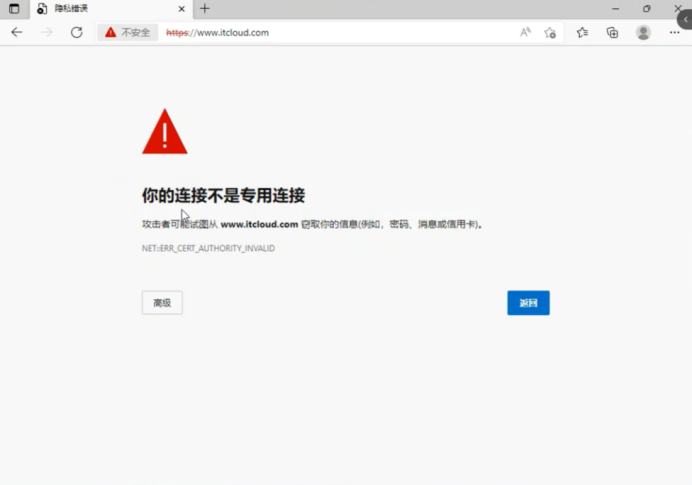
1.13 win11上测试www.itcloud.com

1.14 查看阿帕奇的状态及端口
[root@server10 ~]# systemctl status httpd								查看阿帕奇的状态
● httpd.service - The Apache HTTP Server
     Loaded: loaded (/usr/lib/systemd/system/httpd.service; enabled; preset: disabled)
     Active: active (running) since Fri 2025-03-14 08:45:38 CST; 3min 2s ago    active (running) 活跃
       Docs: man:httpd.service(8)
   Main PID: 854 (httpd)
     Status: "Total requests: 0; Idle/Busy workers 100/0;Requests/sec: 0; Bytes served/sec: >
      Tasks: 177 (limit: 48692)
     Memory: 44.5M
        CPU: 660ms
     CGroup: /system.slice/httpd.service
             ├─854 /usr/sbin/httpd -DFOREGROUND
             ├─953 /usr/sbin/httpd -DFOREGROUND
             ├─954 /usr/sbin/httpd -DFOREGROUND
             ├─955 /usr/sbin/httpd -DFOREGROUND
             └─956 /usr/sbin/httpd -DFOREGROUND

Mar 14 08:45:38 server10 systemd[1]: Starting The Apache HTTP Server...
Mar 14 08:45:38 server10 systemd[1]: Started The Apache HTTP Server.
Mar 14 08:45:38 server10 httpd[854]: Server configured, listening on: port 443, port 80
lines 1-19/19 (END)

[root@server10 ~]# netstat -tunlp | grep httpd		查看阿帕奇的端口
tcp6       0      0 :::80                   :::*                    LISTEN      854/httpd          80 http
tcp6       0      0 :::443                  :::*                    LISTEN      854/httpd
1.15 查看防火墙的状态及启动防火墙
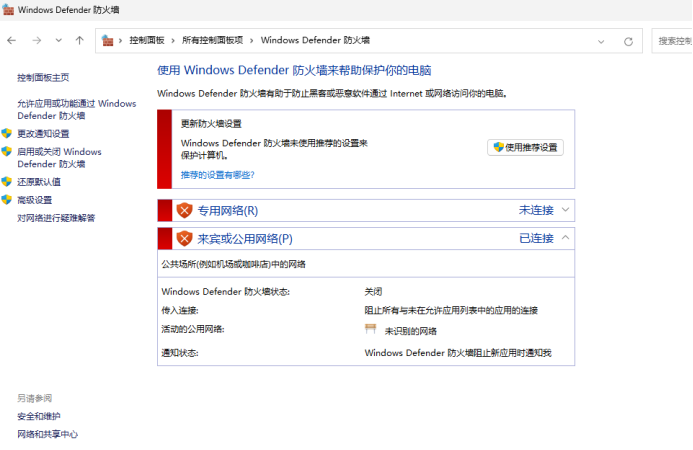
[root@server10 ~]# systemctl status firewalld			查看防火墙的状态
○ firewalld.service - firewalld - dynamic firewall daemon
     Loaded: loaded (/usr/lib/systemd/system/firewalld.service; disabled; preset: enabled)
     Active: inactive (dead)							inactive (dead)不活跃的
       Docs: man:firewalld(1)
[root@server10 ~]#
[root@server10 ~]# systemctl enable --now firewalld	启动防火墙并设置开机启动
Created symlink /etc/systemd/system/dbus-org.fedoraproject.FirewallD1.service → /usr/lib/systemd/system/firewalld.service.
Created symlink /etc/systemd/system/multi-user.target.wants/firewalld.service → /usr/lib/systemd/system/firewalld.service.
1.16 防火墙里添加Http服务
[root@server10 ~]# firewall-cmd --add-service=http	在防火墙里添加Http服务
success
[root@server10 ~]# firewall-cmd --add-service=https	在防火墙里添加Https服务
success
[root@server10 ~]# firewall-cmd --runtime-to-permanent	在防火墙里添加永久运行时
success
2 安装mariadb数据库
2.1 安装mariadb数据库的服务端和客户端
[root@server10 ~]# dnf -y install mariadb-server mariadb 安装mariadb数据库的服务端和客户端2.2启动数据库并设置开机启动
[root@server10 ~]# systemctl enable –now mariadb 启动数据库并设置开机启动
Created symlink /etc/systemd/system/mysql.service → /usr/lib/systemd/system/mariadb.service.
Created symlink /etc/systemd/system/mysqld.service → /usr/lib/systemd/system/mariadb.service.
Created symlink /etc/systemd/system/multi-user.target.wants/mariadb.service → /usr/lib/systemd/system/mariadb.service.
2.3 数据库的安全设置
[root@server10 ~]# mysql_secure_installation 			数据库的安全设置

NOTE: RUNNING ALL PARTS OF THIS SCRIPT IS RECOMMENDED FOR ALL MariaDB
      SERVERS IN PRODUCTION USE!  PLEASE READ EACH STEP CAREFULLY!

In order to log into MariaDB to secure it, we'll need the current
password for the root user. If you've just installed MariaDB, and
haven't set the root password yet, you should just press enter here.

Enter current password for root (enter for none):
OK, successfully used password, moving on...

Setting the root password or using the unix_socket ensures that nobody
can log into the MariaDB root user without the proper authorisation.

You already have your root account protected, so you can safely answer 'n'.

Switch to unix_socket authentication [Y/n] n		交换机切换到unix接口认证吗 n
 ... skipping.

You already have your root account protected, so you can safely answer 'n'.

Change the root password? [Y/n] y			更改root密码吗?y
New password:
Re-enter new password:
Password updated successfully!
Reloading privilege tables..
 ... Success!


By default, a MariaDB installation has an anonymous user, allowing anyone
to log into MariaDB without having to have a user account created for
them.  This is intended only for testing, and to make the installation
go a bit smoother.  You should remove them before moving into a
production environment.

Remove anonymous users? [Y/n] y			移除匿名用户吗?y
 ... Success!Disallow root login remotely? [Y/n] y			禁止root 远程登陆吗?y
 ... Success!

By default, MariaDB comes with a database named 'test' that anyone can
access.  This is also intended only for testing, and should be removed
before moving into a production environment.

Remove test database and access to it? [Y/n] y			移除测试数据库吗?y
 - Dropping test database...
 ... Success!
 - Removing privileges on test database...
 ... Success!

Reloading the privilege tables will ensure that all changes made so far
will take effect immediately.

Reload privilege tables now? [Y/n] y					重新加载数据表吗?y
 ... Success!

Cleaning up...

All done!  If you've completed all of the above steps, your MariaDB
installation should now be secure.

Thanks for using MariaDB!
2.4 防火墙里添加端口及启动防火墙
[root@server10 ~]# firewall-cmd --add-port=3306/tcp		在防火墙里添加tcp的3306端口		3306 mariadb/mysql的端口号(不是封端口就是封服务,wins和linuxs通用)
success
[root@server10 ~]# firewall-cmd --runtime-to-permanent
success
3 php数据源
3.0 安装php及其插件
[root@server10 ~]# dnf -y install php-{common,gmp,fpm,curl,intl,pdo,mbstring,gd,xml,cli,zip,mysqli} 安装php及其插件3.1 查看php的版本及安装php的数据源
[root@server10 ~]#php version 查看php的版本[root@server10 ~]# dnf -y install https://rpms.remirepo.net/enterprise/remi-release-9.rpm 安装
php的数据源3.2 显示php的单元列表
[root@server10 ~]#dnf module list php
Last metadata expiration check: 0:00:07 ago on Fri 14 Mar 2025 09:04:27 AM CST.
Rocky Linux 9 - AppStream
Name         Stream           Profiles                          Summary
php          8.1              common [d], devel, minimal        PHP scripting language
php          8.2              common [d], devel, minimal        PHP scripting language

Remi's Modular repository for Enterprise Linux 9 - x86_64
Name         Stream           Profiles                          Summary
php          remi-7.4         common [d], devel, minimal        PHP scripting language
php          remi-8.0         common [d], devel, minimal        PHP scripting language
php          remi-8.1         common [d], devel, minimal        PHP scripting language
php          remi-8.2         common [d], devel, minimal        PHP scripting language
php          remi-8.3         common [d], devel, minimal        PHP scripting language
php          remi-8.4         common [d], devel, minimal        PHP scripting language       最新的 安装这个
3.3 再次安装php及其插件(这里的php是最新版本8.4)
[root@server10 ~]# dnf -y install php-{common,gmp,fpm,curl,intl,pdo,mbstring,gd,xml,cli,zip,mysqli} 安装php及其插件
3.4 查看php的版本
[root@server10 ~]#php version 查看php的版本3.5 编辑php的配置文件
[root@server10 ~]# vim /etc/php.ini 					编辑php的配置文件
409 max_execution_time = 300							#最大执行时间300秒
855 upload_max_filesize = 100M							#上传最大文件100兆
703 post_max_size = 128M								#通过post(发送数据的一种方式php)方法向服务器提交的数据总量为128M
933 date.timezone = Asia/Shanghai						#设置时区为亚洲上海
3.6 编辑http的配置文件
[root@server10 ~]# vim /etc/httpd/conf/httpd.conf 		编辑http的配置文件
62 AddHandler php-script .php							让阿帕奇支持PHP(开发网站的编程语言:面向对象的,开发工具)
vscode添加模块就支持php
3.7 创建php的测试页面
[root@server10 ~]# vim /www/itcloud.com/info.php		创建php的测试页面
<?php												页面的内容(显示LAMP的版本)
phpinfo();											测试完成后,测试页面必须删除
?>
3.8 启动php引擎及启动阿帕奇
[root@server10 ~]# systemctl restart php-fpm 重启php的引擎
[root@server10 ~]# systemctl restart httpd 重启阿帕奇
3.9 删除info.php、index.html页面
[root@server10 ~]#cd /www/itcloud.com/				切换到www/itcloud.com目录下
[root@server10 itcloud.com]#ls
index.html	 info.php
[root@server10 ~]#rm info.php							删除info.php页面
rm:是否删除普通文件‘info.php? ’y
[root@server10 ~]#ls
index.html
[root@server10 ~]#rm index.html						删除index.html页面
rm:是否删除普通文件‘index.html? ’y
[root@server10 ~]#ls
[root@server10 ~]#init 0								关机做快照
[root@server10 ~]#
4.0 关机做快照 名为:LAMP 及设置wordpress数据库
4.1 编辑php引擎的配置文件
[root@server10 ~]# vim /etc/php-fpm.d/www.conf		编辑php引擎的配置文件
439 php_value[max_execution_time]=600					php脚本最大执行时间600秒
440 php_value[memory_limit]=2G						php内存脚本限制为2G
441 php_value[post_max_size]=2G						用户通过post方法向服务器提交的数据总量不能超过2G(防止数据攻击,)
442 php_value[upload_max_filesize]=2G					上传文件的最大容量为2G
443 php_value[max_input_time]=600						PHP最大接收时间600秒
444 php_value[max_input_vars]=2000					php最多可接受2000个输入变量(为了安全)
445 php_value[date.timezone]=Asia/Shanghai				php时区亚洲上海
4.2 wordpress数据库配置
4.2.1 登录数据库
[root@server10 ~]# mysql								登录数据库
Welcome to the MariaDB monitor.  Commands end with ; or \g.
Your MariaDB connection id is 3
Server version: 10.5.27-MariaDB MariaDB Server

Copyright (c) 2000, 2018, Oracle, MariaDB Corporation Ab and others.

Type 'help;' or '\h' for help. Type '\c' to clear the current input statement.
4.2.2 创建wordpress数据库
MariaDB [(none)]> create database wordpress;			创建wordpress数据库
Query OK, 1 row affected (0.000 sec)
4.2.3 wordpress数据库全部授权
MariaDB [(none)]>
MariaDB [(none)]> grant all privileges on wordpress.* to 'wordpressuser'@'localhost' identified by 'P4ssw0rd@123.com';									将wordpress数据库全部授权给wordpressuser用户,只允许本地登录,授权认证密码:P4ssw0rd@123.com
Query OK, 0 rows affected (0.002 sec)

MariaDB [(none)]> flush privileges;						刷新授权
Query OK, 0 rows affected (0.001 sec)

MariaDB [(none)]> exit									退出
Bye
4.3 解压wordpress软件包
4.3.1 wordpress软件包
上传一个压缩包到系统中
4.3.2 解压wordpress软件包
[root@server10 ~]# ls
anaconda-ks.cfg wordpress wordpress-6.7.2.zip
[root@server10 ~]# unzip wordpress-6.7.2.zip 解压wordpress软件包
4.4 wordpress目录
[root@server10 ~]# cd wordpress/						进入wordpress目录
[root@server10 wordpress]# ls
index.php        wp-admin              wp-content         wp-load.php      wp-signup.php
license.txt      wp-blog-header.php    wp-cron.php        wp-login.php     wp-trackback.php
readme.html      wp-comments-post.php  wp-includes        wp-mail.php      xmlrpc.php
wp-activate.php  wp-config-sample.php  wp-links-opml.php  wp-settings.php
[root@server10 wordpress]# cp -r * /www/itcloud.com/		将wordpress目录中的所有文件复制到/www/itcloud.com/网站目录下
4.5 网站目录
[root@server10 wordpress]# cd /www/itcloud.com/			进入网站目录下
[root@server10 itcloud.com]# ls
index.php        wp-admin              wp-content         wp-load.php      wp-signup.php
license.txt      wp-blog-header.php    wp-cron.php        wp-login.php     wp-trackback.php
readme.html      wp-comments-post.php  wp-includes        wp-mail.php      xmlrpc.php
wp-activate.php  wp-config-sample.php  wp-links-opml.php  wp-settings.php
4.6 网站模板文件复制到网站配置文件
[root@server10 itcloud.com]# cp wp-config-sample.php wp-config.php 将网站模板文件复制到网站配置文件4.7 编辑wordpress数据库文件
[root@server10 itcloud.com]#vim wp-config.php				编辑wordpress数据库文件
define( 'DB_NAME', 'wordpress' );							#数据库的名称wordpress

/** Database username */									#数据库的用户wordpress
define( 'DB_USER', 'wordpressuser' );

/** Database password */									#数据库的密码wordpress  之前在数据库授权的数据库用户和密码
define( 'DB_PASSWORD', 'P4ssw0rd@123.com' );
4.8 重启php、阿帕奇引擎
[root@server10 itcloud.com]#cd
[root@server10 itcloud.com]#systemctl restart php-fpm #重启php引擎
[root@server10 itcloud.com]#sytemctl restart httpd #重启阿帕奇
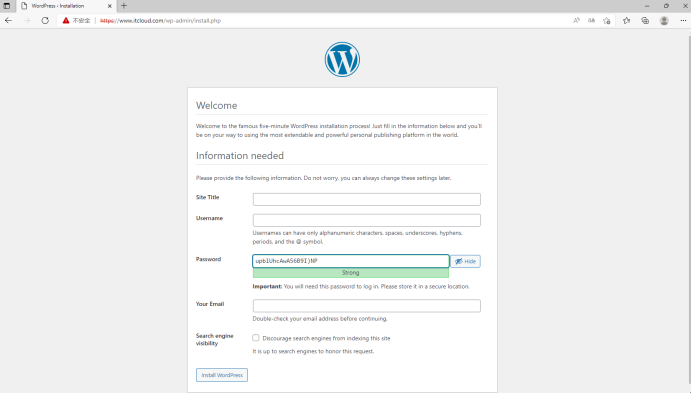
[root@server10 itcloud.com]#5 英文版的需要注册用户
下载中文编码wordpress-6.6.2-zh_CN