Zabbix应用:监控Linux主机、监控apache、监控数据库、监控wins系统(win2025为例)
实验环境:在第一部分 搭建zabbix基础上,部署监控服务
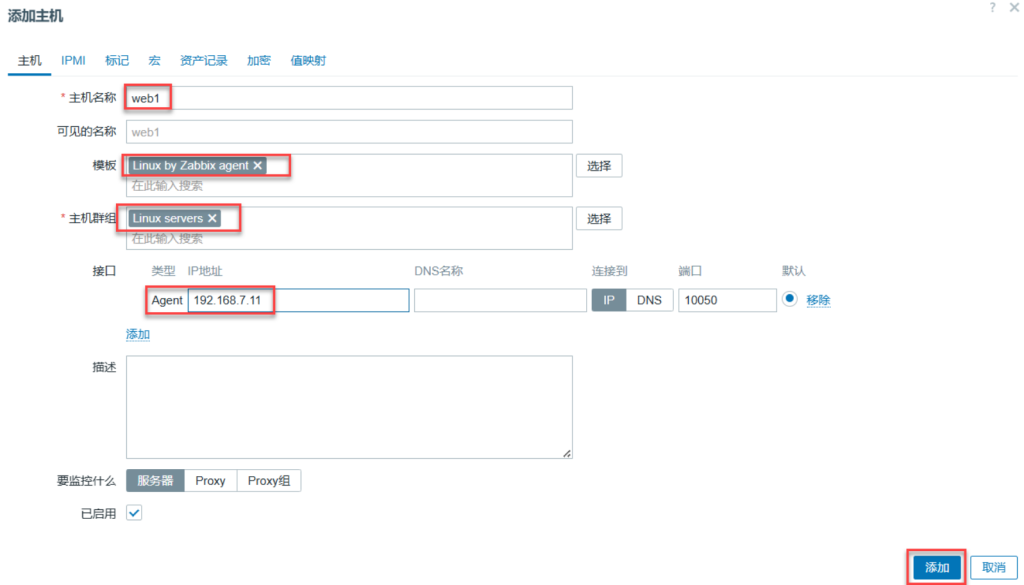
开启server7.11 命名为:web1 监控web 监控Apache
监控win2025(wins) 8网卡
一、监控Linux主机
1.1修改主机名:服务器7.11修改为web1

1.2 查看SELinux状态和查看防火墙状态
[root@server10 ~]# sestatus (查看SELinux状态)
SELinux status:                 disabled
[root@server10 ~]# systemctl status firewalld(查看防火墙状态)
○ firewalld.service - firewalld - dynamic firewall daemon
     Loaded: loaded (/usr/lib/systemd/system/firewalld.service; disabled; preset: enabled)
     Active: inactive (dead)
       Docs: man:firewalld(1)
1.3 编辑时间同步配置文件、启动chronyd并设置开机启动、运行时间同步、查看时间和日期、将时间和日期保存到系统中
1.3.1 编辑时间同步配置文件
#pool ntp.aliyun.com iburstpool ntp.aliyun.com iburst(同步阿里云时间)1.3.1 启动chronyd并设置开机启动
[root@server10 ~]# systemctl enable --now chronyd(启动chronyd并设置开机启动)
Created symlink /etc/systemd/system/multiuser.target.wants/chronyd.service →/usr/lib/systemd/system/chronyd.service.
1.3.2 运行时间同步
  .-- Source mode  '^' = server, '=' = peer, '#' = local clock.
 / .- Source state '*' = current best, '+' = combined, '-' = not combined,
| /             'x' = may be in error, '~' = too variable, '?' = unusable.
||                                                 .- xxxx [ yyyy ] +/- zzzz
||      Reachability register (octal) -.           |  xxxx = adjusted offset,
||      Log2(Polling interval) --.      |          |  yyyy = measured offset,
||                                \     |          |  zzzz = estimated error.
||                                 |    |           \
MS Name/IP address         Stratum Poll Reach LastRx Last sample
===============================================================================
^* 203.107.6.88                  2   6     7     1    +22ms[ +137ms] +/-  278ms
1.3.3 查看时间和日期
Wed Apr  2 09:52:56 AM CST 2025
[root@server10 ~]#
1.3.4 将时间和日期保存到系统中
[root@server10 ~]# clock -w1.4 安装zabbix7.0的数据源
[root@web1 ~]# rpm -Uvh https://repo.zabbix.com/zabbix/7.0/rocky/9/x86_64/zabbix-release-latest-7.0.el9.noarch.rpm
Retrieving https://repo.zabbix.com/zabbix/7.0/rocky/9/x86_64/zabbix-release-latest-7.0.el9.noarch.rpm
warning: /var/tmp/rpm-tmp.ViN6al: Header V4 RSA/SHA512 Signature, key ID b5333005: NOKEY
Verifying...                          ################################# [100%]
Preparing...                          ################################# [100%]
Updating / installing...
   1:zabbix-release-7.0-5.el9         ################################# [100%]
1.5 清空dnf缓存
[root@web1 ~]# dnf clean all1.6 重新生成dnf缓存
[root@web1 ~]# dnf makecache1.7 安装zabbix2(2比1快)
[root@web1 ~]# dnf -y install zabbix-agent21.8 备份zabbix代理2的配置文件
[root@web1 ~]# cp /etc/zabbix/zabbix_agent2.conf /etc/zabbix/zabbix_agent2.conf.bak1.9 编辑zabbix代理2的配置文件
[root@web1 ~]# vim /etc/zabbix/zabbix_agent2.conf
82 Server=192.168.7.10				zabbix服务器的IP地址
135 ServerActive=192.168.7.10		zabbix活跃的服务器的IP地址
146 Hostname=web1					主机名:客户机的计算机名
1.10 启动zabbix代理2,并设置开机启动
[root@web1 ~]# systemctl enable --now zabbix-agent2.service
Created symlink /etc/systemd/system/multi-user.target.wants/zabbix-agent2.service → /usr/lib/systemd/system/zabbix-agent2.service.
1.11 查看zabbix的端口号(如果有端口号,表示zabbix代理起来了)
[root@web1 ~]# netstat -tunlp | grep zabbix
tcp6       0      0 :::10050                :::*                    LISTEN      38899/zabbix_agent2 		10050表示zabbix_agent2
1.12 启动防火墙并设置开机启动
[root@web1 ~]# systemctl enable --now firewalld

Created symlink /etc/systemd/system/dbus-org.fedoraproject.FirewallD1.service → /usr/lib/systemd/system/firewalld.service.

Created symlink /etc/systemd/system/multi-user.target.wants/firewalld.service → /usr/lib/systemd/system/firewalld.service.
1.13 在防火墙里添加tcp的10050端口
[root@web1 ~]# firewall-cmd --add-port=10050/tcp 1.14 在防火墙里永久添加运行时、查看防火墙的所有规则
[root@web1 ~]# firewall-cmd --runtime-to-permanent
success
[root@web1 ~]# firewall-cmd --list-all
public (active)
target: default
icmp-block-inversion: no
interfaces: ens160
sources:
services: cockpit dhcpv6-client ssh
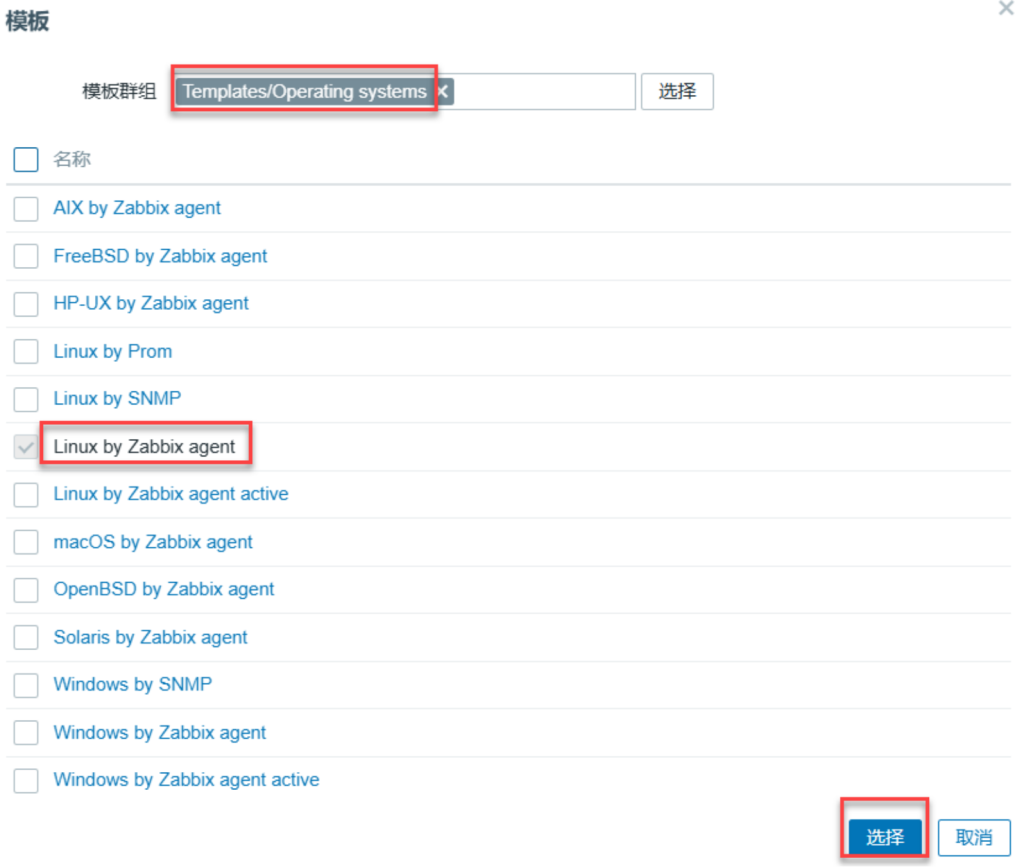
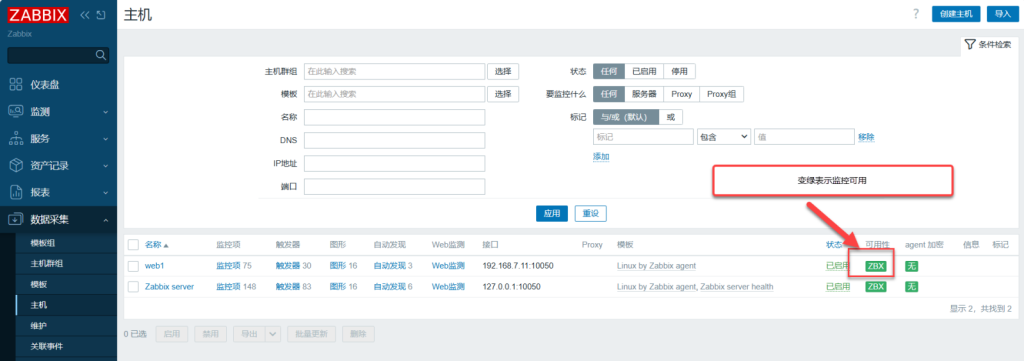
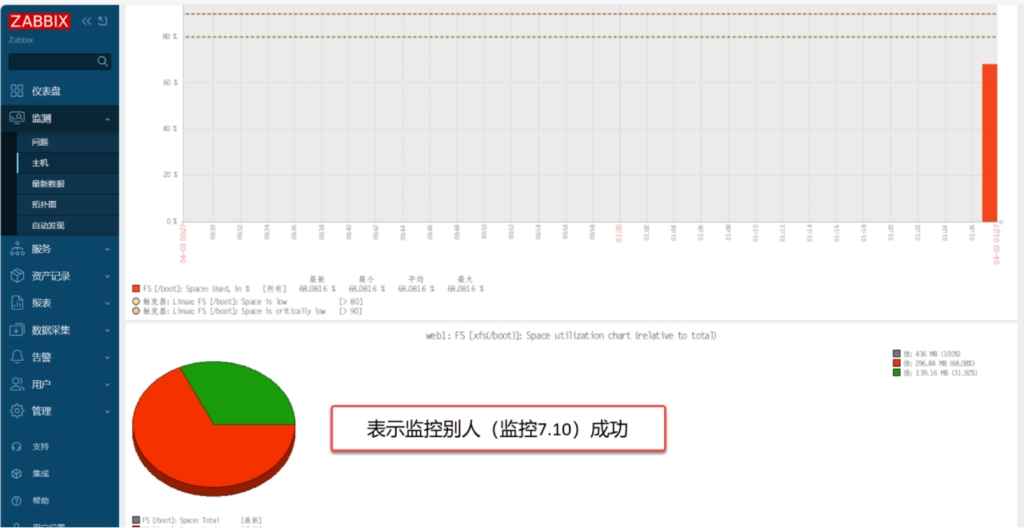
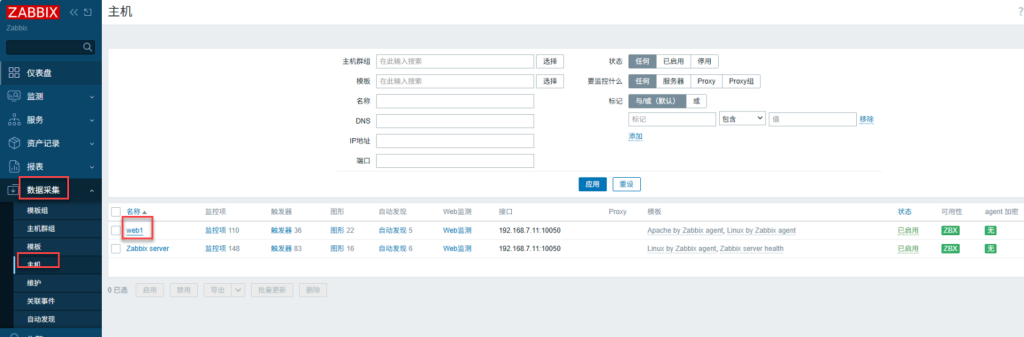
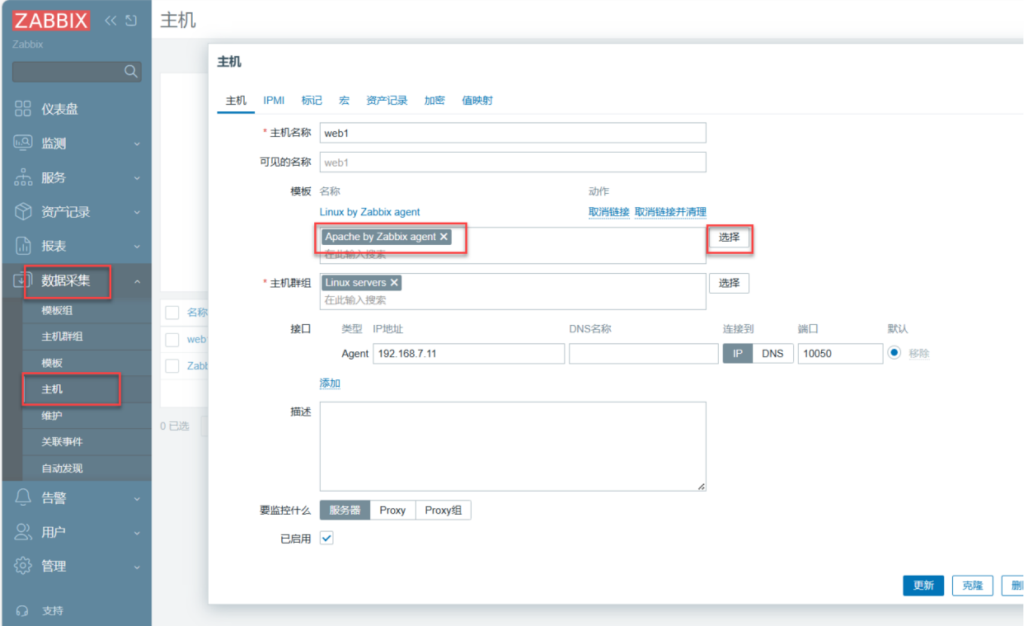
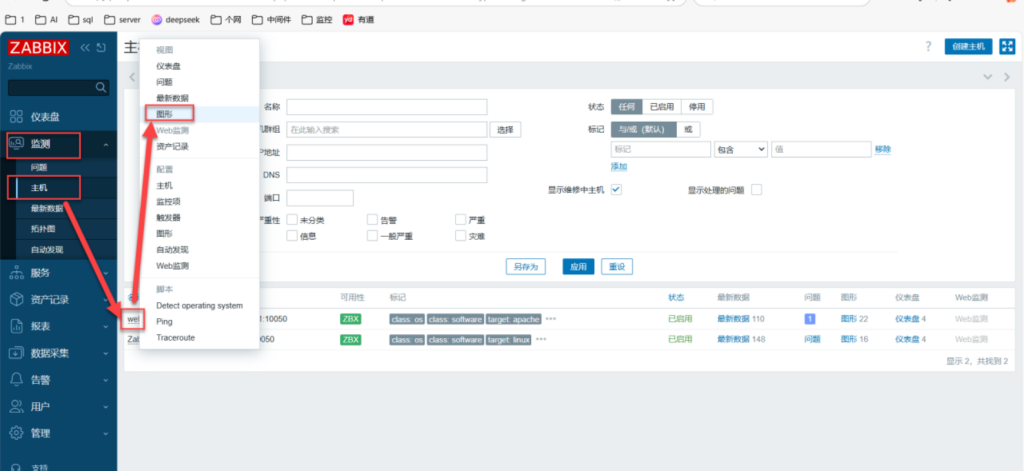
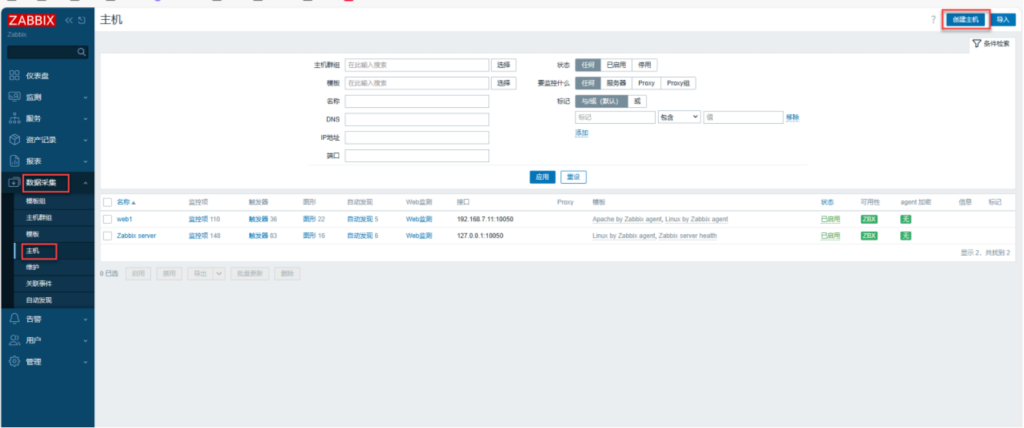
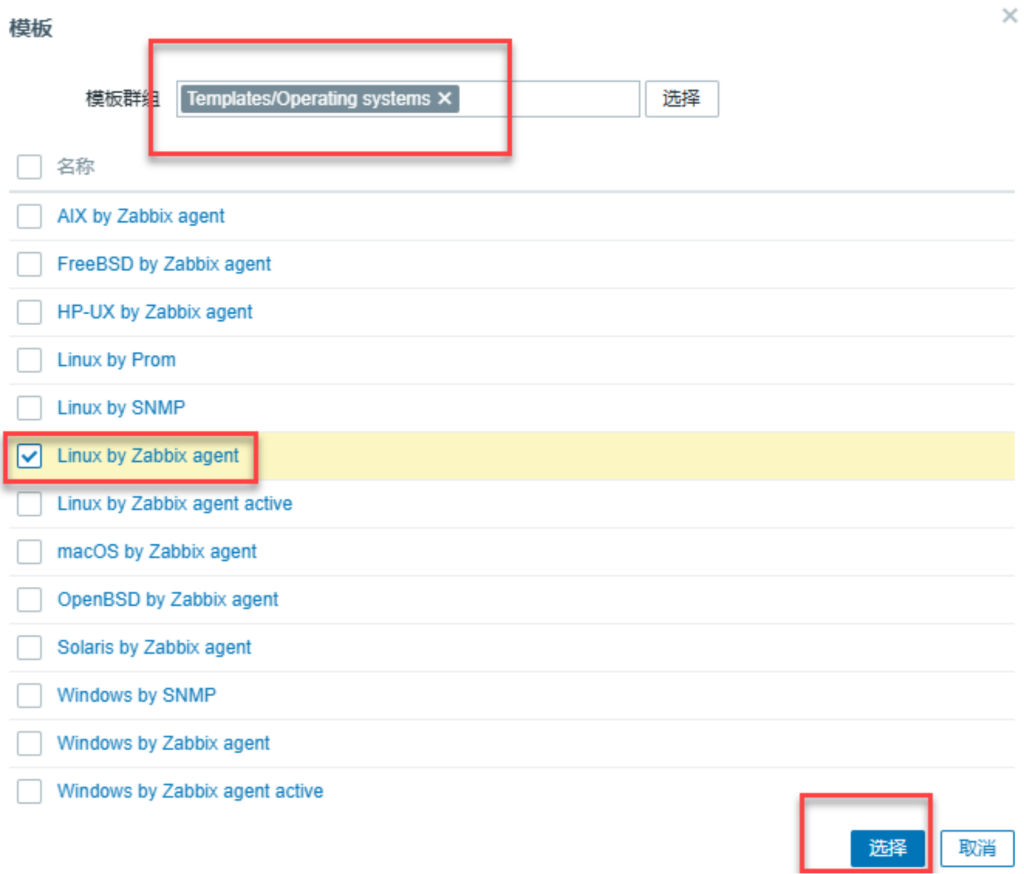
ports: 10050/tcp1.15 本机输入网址:192.168.7.10:8080 在zabbix上关联主机
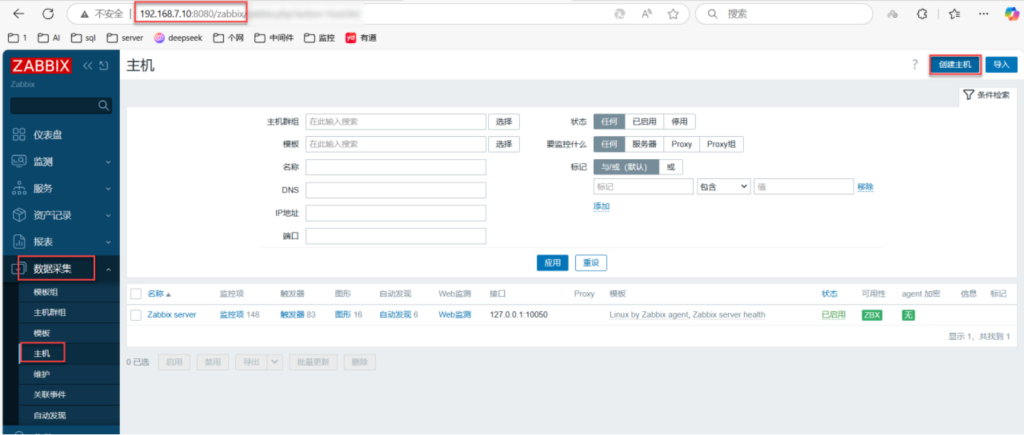
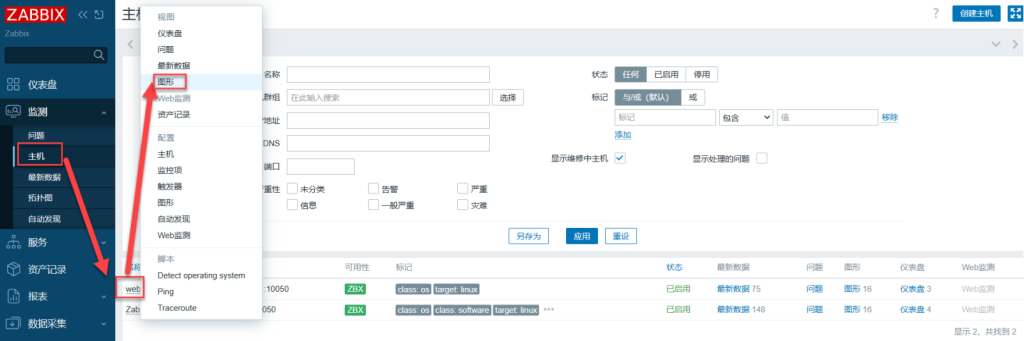
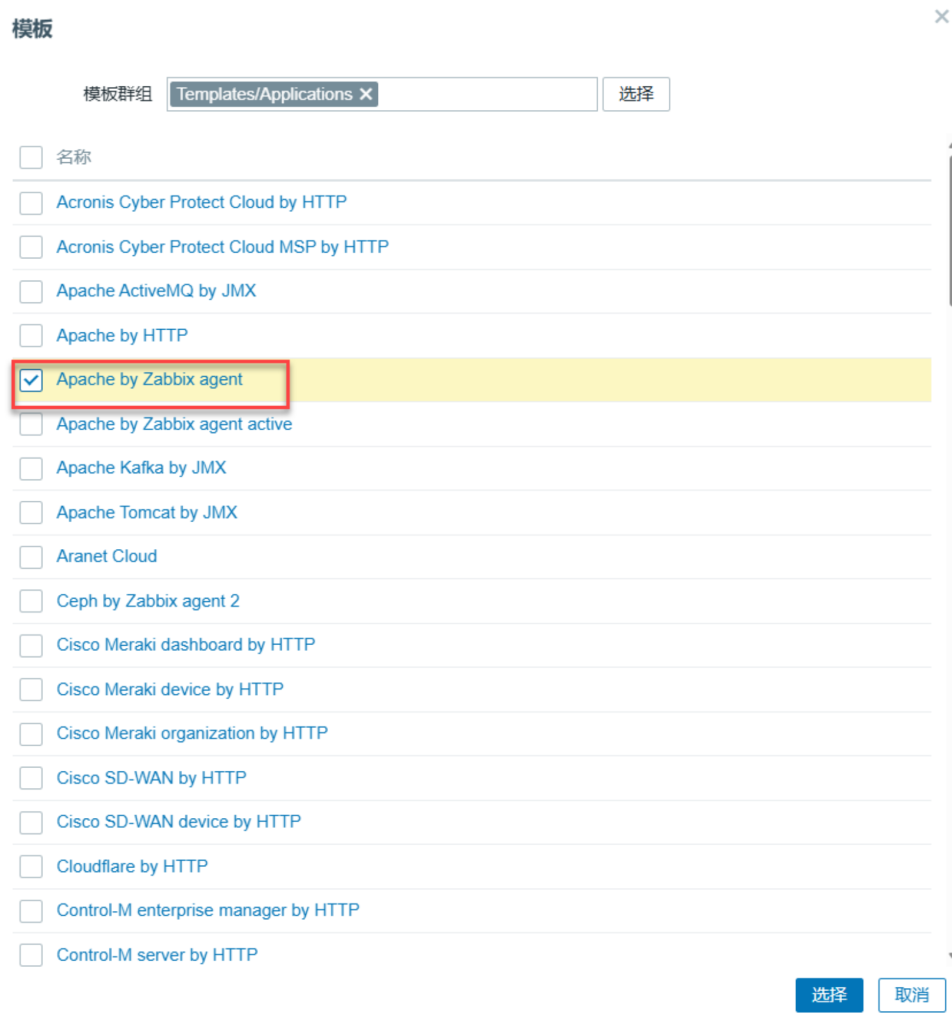
二、监控Apache
2.1 安装阿帕奇
[root@web1 ~]# dnf -y install httpd 2.2 启动阿帕奇并设置阿帕奇开机启动
[root@web1 ~]# systemctl enable --now httpd
Created symlink /etc/systemd/system/multi-user.target.wants/httpd.service → /usr/lib/systemd/system/httpd.service.
2.3 在防火墙里添加http:80,https(端口号443)服务
[root@web1 ~]# firewall-cmd --add-service={http,https}2.4 在防火墙里永久添加运行时
[root@web1 ~]# firewall-cmd --runtime-to-permanent
success
2.5 查看防火墙的所有规则
[root@web1 ~]# firewall-cmd --list-all								查看防火墙的所有规则
public (active)
  target: default
  icmp-block-inversion: no
  interfaces: ens160
  sources:
  services: cockpit dhcpv6-client http https ssh
  ports: 10050/tcp
2.6 创建阿帕奇服务状态的配置文件
vim /etc/httpd/conf.d/server-status.conf <Location "/server-status"> #定义服务状态的位置
SetHandler server-status #开启触发器服务器的状态
Require all granted #允许所有人访问
</Location>
2.7 重新加载阿帕奇
[root@web1 ~]# systemctl reload httpd
2.8 本地电脑输入192.168.7.11/server-status测试
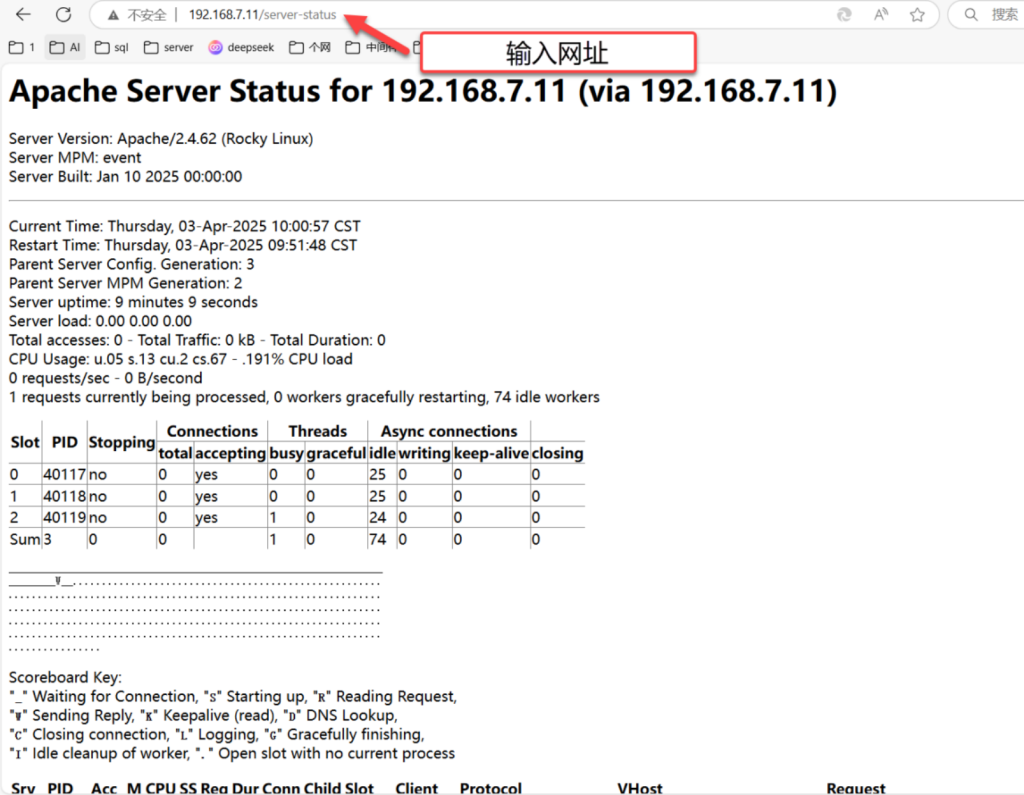
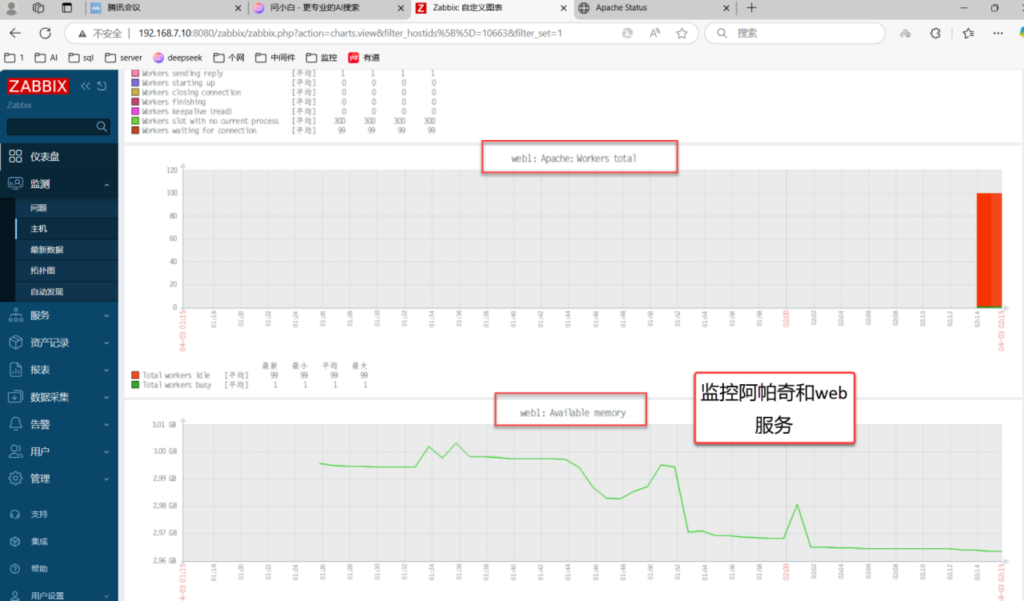
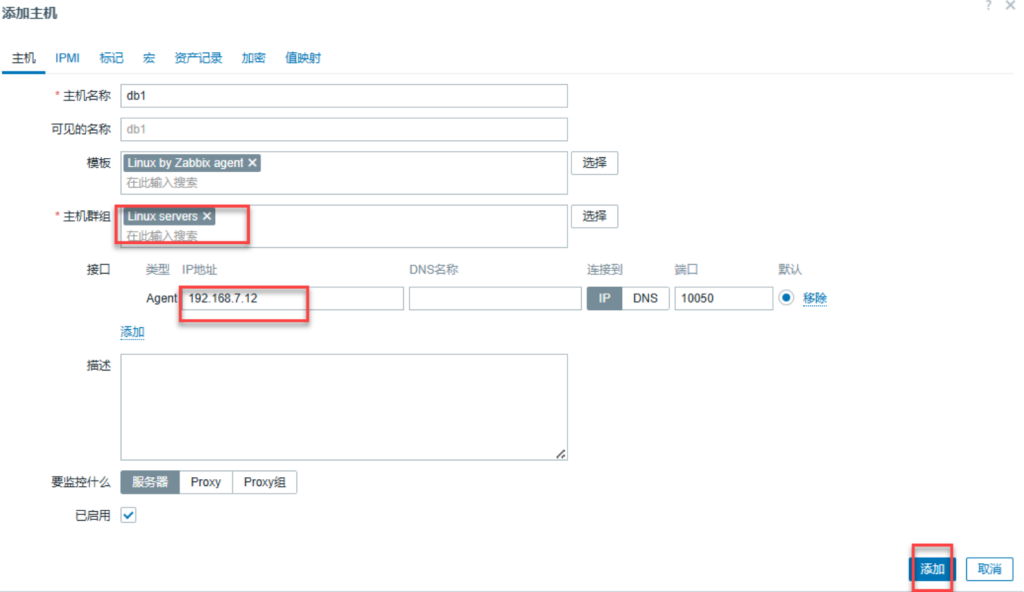
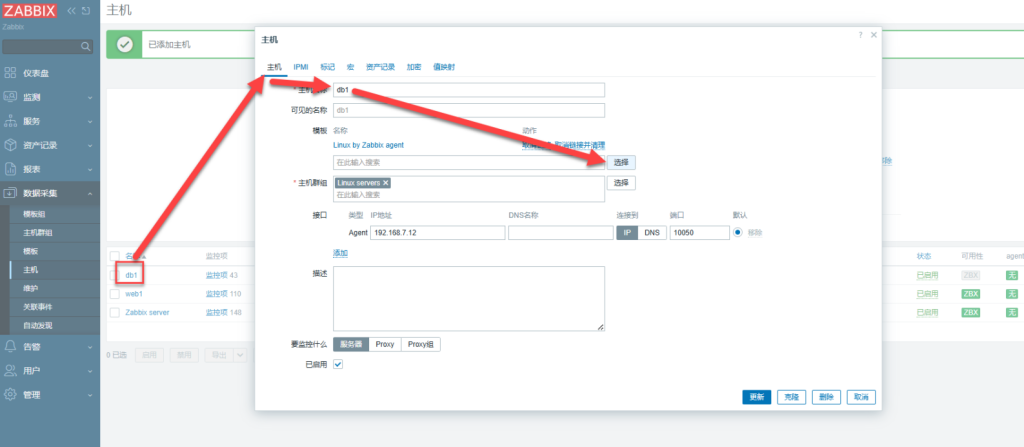
三、监控数据库
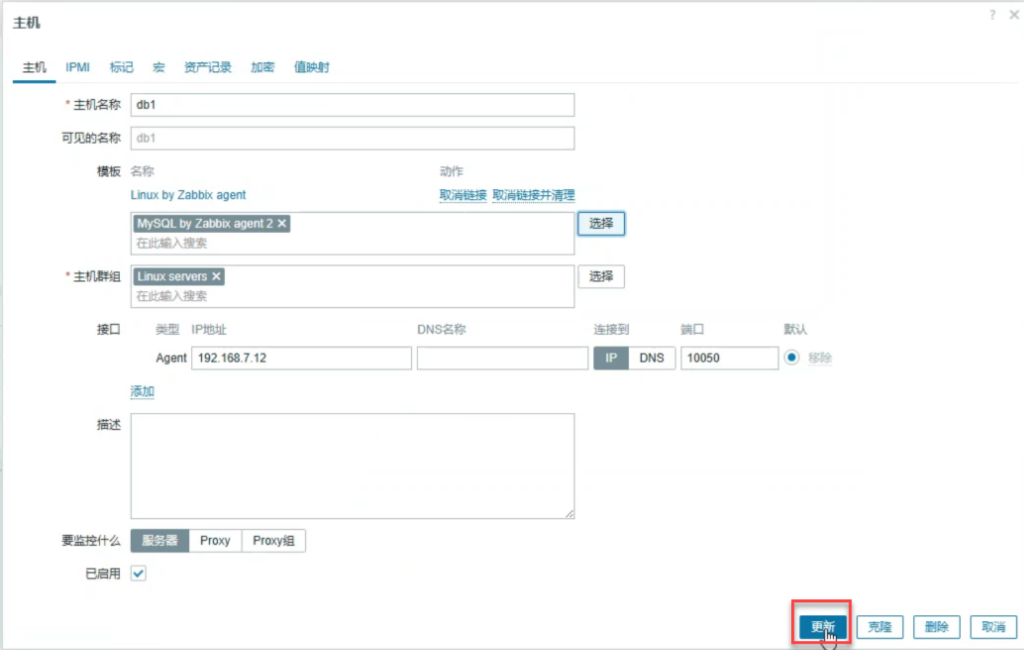
3.1 修改虚拟机7.12主机名为db1

3.2 查看SELinux状态、查看防火墙状态
[root@db1 ~]# sestatus
SELinux status:                 disabled
[root@db1 ~]# systemctl status firewalld
○ firewalld.service - firewalld - dynamic firewall daemon
     Loaded: loaded (/usr/lib/systemd/system/firewalld.service; disabled; preset: enabled)
     Active: inactive (dead)
       Docs: man:firewalld(1)
[root@db1 ~]# vim /etc/chrony.conf
3.3 编辑时间同步配置文件
[root@db1 ~]# vim /etc/chrony.conf pool ntp.aliyun.com iburst(同步阿里云时间)3.4 启动chronyd并设置开机启动
[root@server10 ~]# systemctl enable --now chronyd
Created symlink /etc/systemd/system/multi-user.target.wants/chronyd.service → /usr/lib/systemd/system/chronyd.service.
3.5 运行时间同步
[root@server10 ~]# chronyc sources -v

  .-- Source mode  '^' = server, '=' = peer, '#' = local clock.
 / .- Source state '*' = current best, '+' = combined, '-' = not combined,
| /             'x' = may be in error, '~' = too variable, '?' = unusable.
||                                                 .- xxxx [ yyyy ] +/- zzzz
||      Reachability register (octal) -.           |  xxxx = adjusted offset,
||      Log2(Polling interval) --.      |          |  yyyy = measured offset,
||                                \     |          |  zzzz = estimated error.
||                                 |    |           \
MS Name/IP address         Stratum Poll Reach LastRx Last sample
===============================================================================
^* 203.107.6.88                  2   6     7     1    +22ms[ +137ms] +/-  278ms
3.6 查看时间和日期
[root@server10 ~]# date
Wed Apr  2 09:52:56 AM CST 2025
3.7 将时间和日期保存到系统中
[root@server10 ~]#
[root@server10 ~]# clock -w
3.8 安装zabbix7.0的数据源
[root@db1 ~]# rpm -Uvh https://repo.zabbix.com/zabbix/7.0/rocky/9/x86_64/zabbix-release-latest-7.0.el9.noarch.rpm
Retrieving https://repo.zabbix.com/zabbix/7.0/rocky/9/x86_64/zabbix-release-latest-7.0.el9.noarch.rpm
warning: /var/tmp/rpm-tmp.fD2MEK: Header V4 RSA/SHA512 Signature, key ID b5333005: NOKEY
Verifying...                          ################################# [100%]
Preparing...                          ################################# [100%]
Updating / installing...
   1:zabbix-release-7.0-5.el9         ################################# [100%]
3.9 清空dnf缓存
[root@db1 ~]# dnf clean all
0 files removed
3.10 重新生成dnf缓存
Rocky Linux 9 - BaseOS                                        1.3 MB/s | 2.3 MB     00:01
Rocky Linux 9 - AppStream                                     3.2 MB/s | 8.6 MB     00:02
Rocky Linux 9 - Extras                                         15 kB/s |  16 kB     00:01
Zabbix Official Repository - x86_64                            84 kB/s | 215 kB     00:02
Zabbix Official Repository (non-supported) - x86_64           567  B/s | 1.1 kB     00:02
Zabbix Official Repository (tools) - x86_64                   969  B/s | 2.0 kB     00:02
Metadata cache created.
3.11 安装zabbix-agent2
[root@db1 ~]# dnf -y install zabbix-agent2
3.12 编辑zabbix-agent2的配置文件
[root@db1 ~]# vim /etc/zabbix/zabbix_agent2.conf 																		编辑zabbix-agent2的配置文件
82 Server=192.168.7.10																									zabbix服务器的IP
135 ServerActive=192.168.7.10																							zabbix活跃服务器的IP
146 Hostname=db1																											主机名:客户机的名称
3.13 启动zabbix代理2,并设置开机启动
[root@db1 ~]# systemctl enable --now zabbix-agent2.service
Created symlink /etc/systemd/system/multi-user.target.wants/zabbix-agent2.service → /usr/lib/systemd/system/zabbix-agent2.service.
3.14 查看zabbix的端口号(如果有端口号,表示zabbix代理起来了))
[root@db1 ~]# netstat -tunlp | grep zabbix
tcp6       0      0 :::10050                :::*                    LISTEN      38882/zabbix_agent2
3.15 启动防火墙并设置开机启动、在防火墙里添加tcp的10050zabbix端口号)端口
[root@db1 ~]# firewall-cmd --add-port=10050/tcp
success
3.16 在防火墙里添加tcp的(3306数据库端口号)数据库端口
[root@db1 ~]# firewall-cmd --add-port=3306/tcp
success
3.17 在防火墙里添加永久运行时
[root@db1 ~]# firewall-cmd --runtime-to-permanent
success
3.18 查看防火墙的所有规则
[root@db1 ~]# firewall-cmd --list-all
public (active)
  target: default
  icmp-block-inversion: no
  interfaces: ens160
  sources:
  services: cockpit dhcpv6-client ssh
  ports: 10050/tcp 3306/tcp	看这个
3.19 安装数据库的服务端和客户端
[root@db1 ~]# dnf -y install mariadb-server mariadb
3.20 启动mariadb并设置开机启动、数据库的安全设置
[root@db1 ~]# systemctl enable --now mariadb
Created symlink /etc/systemd/system/mysql.service → /usr/lib/systemd/system/mariadb.service.
Created symlink /etc/systemd/system/mysqld.service → /usr/lib/systemd/system/mariadb.service.
Created symlink /etc/systemd/system/multi-user.target.wants/mariadb.service → /usr/lib/systemd/system/mariadb.service.
[root@db1 ~]# mysql_secure_installation 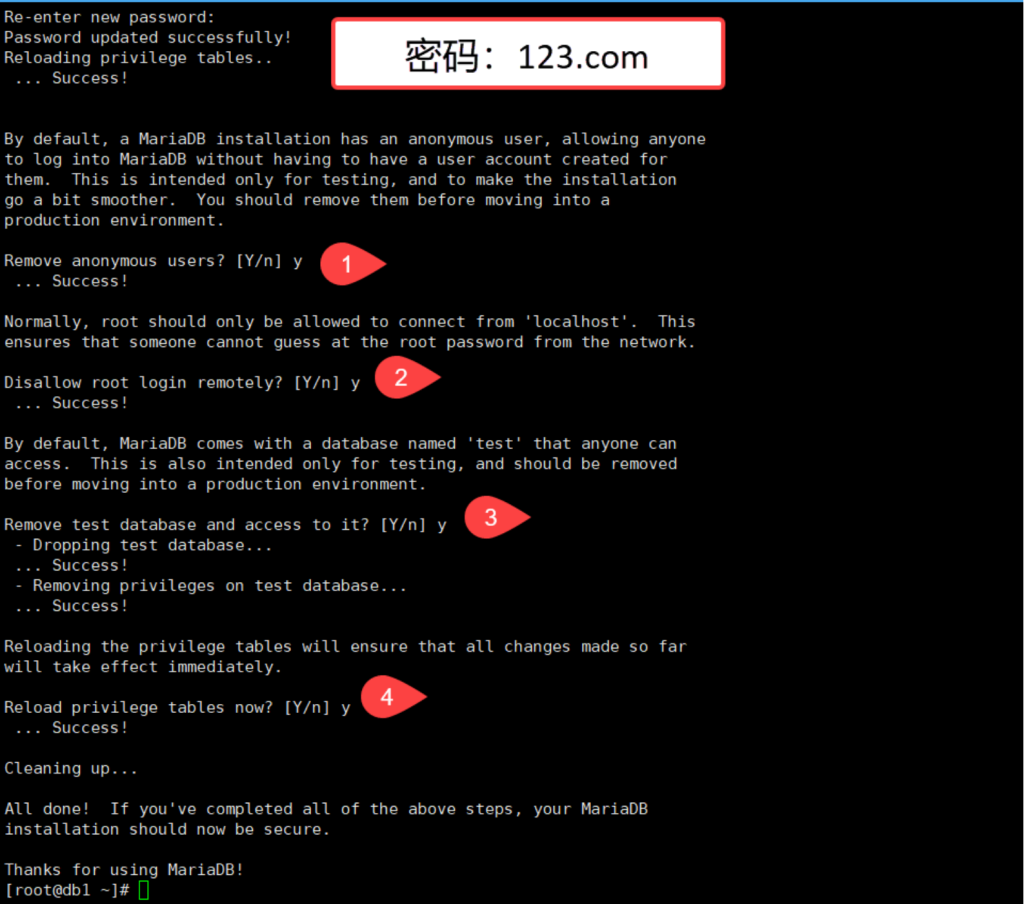
3.21 登录数据库
[root@db1 ~]# mysql
Welcome to the MariaDB monitor.  Commands end with ; or \g.
Your MariaDB connection id is 11
Server version: 10.5.27-MariaDB MariaDB Server

Copyright (c) 2000, 2018, Oracle, MariaDB Corporation Ab and others.

Type 'help;' or '\h' for help. Type '\c' to clear the current input statement.
3.22 使用MySQL数据库
MariaDB [(none)]> use mysql;
Reading table information for completion of table and column names
You can turn off this feature to get a quicker startup with -A
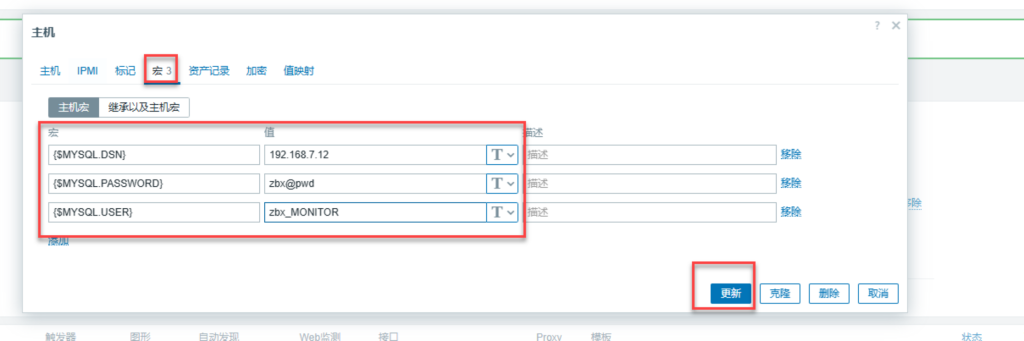
Database changed3.23 创建zabbix monitor用户;zbx_monitor’@’%允许从任何IP访问;认证的密码为:zbx@pwd
MariaDB [mysql]> create user 'zbx_monitor'@'%' identified by 'zbx@pwd';											创建zabbix monitor用户;zbx_monitor'@'%允许从任何IP访问;认证的密码为:zbx@pwd
Query OK, 0 rows affected (0.001 sec)
3.24 将所有数据库的复制客户端,进程,查看数据库,查看视图,授权给zbx_monitor用户;%允许从任何IP访问
MariaDB [mysql]> grant replication client,process,show databases,show view on *.* to 'zbx_monitor'@'%';
Query OK, 0 rows affected (0.001 sec)
3.25 刷新授权、退出数据库
MariaDB [mysql]> flush privileges;
Query OK, 0 rows affected (0.001 sec)
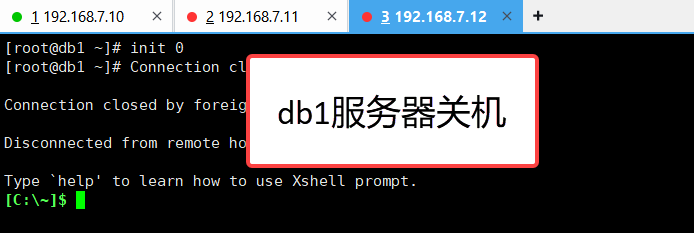
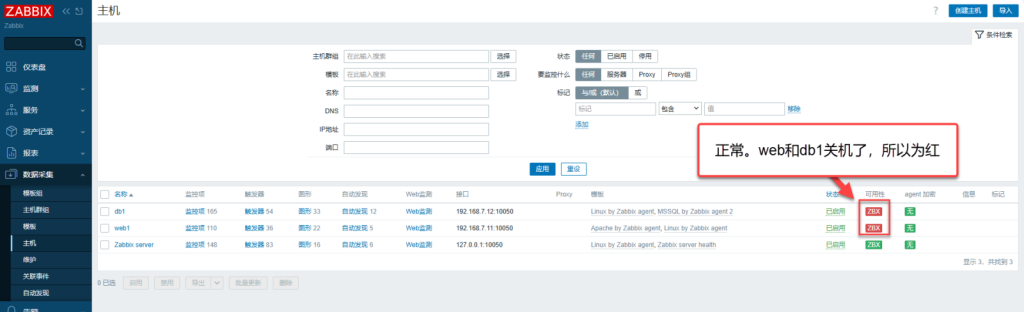
MariaDB [mysql]> exit3.26 zabbix上验证


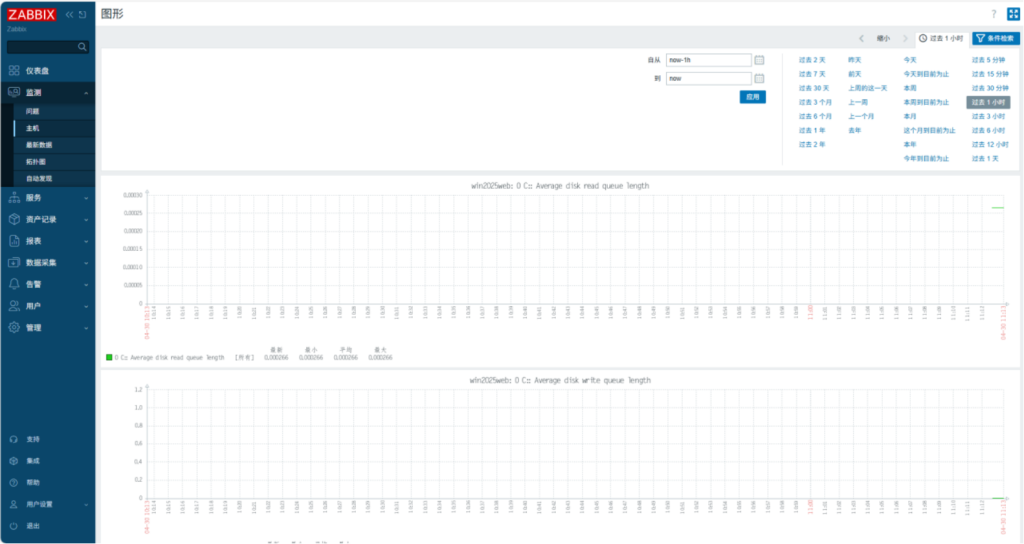
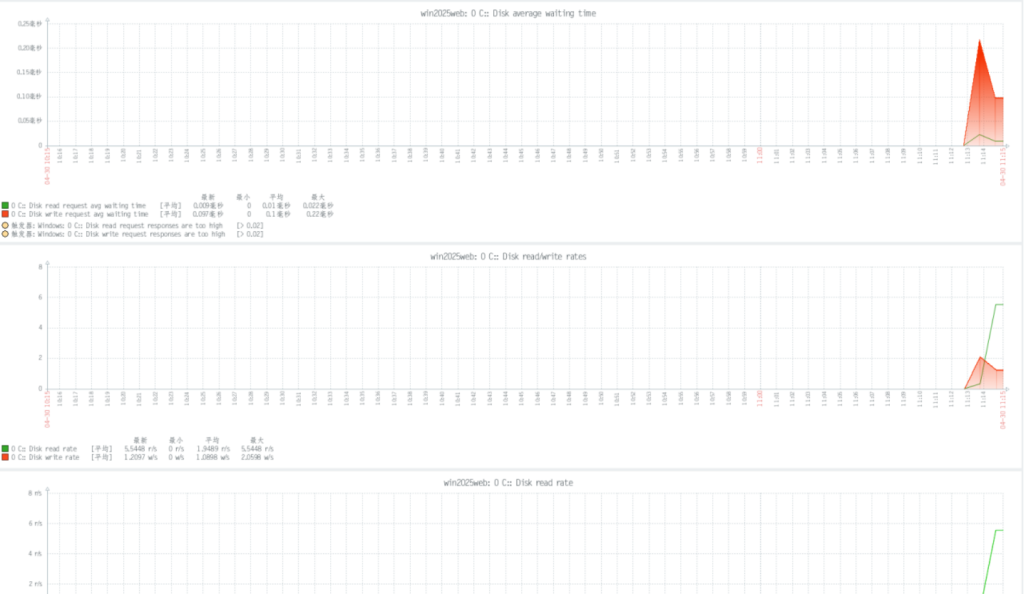
四、监控win2025(wins)
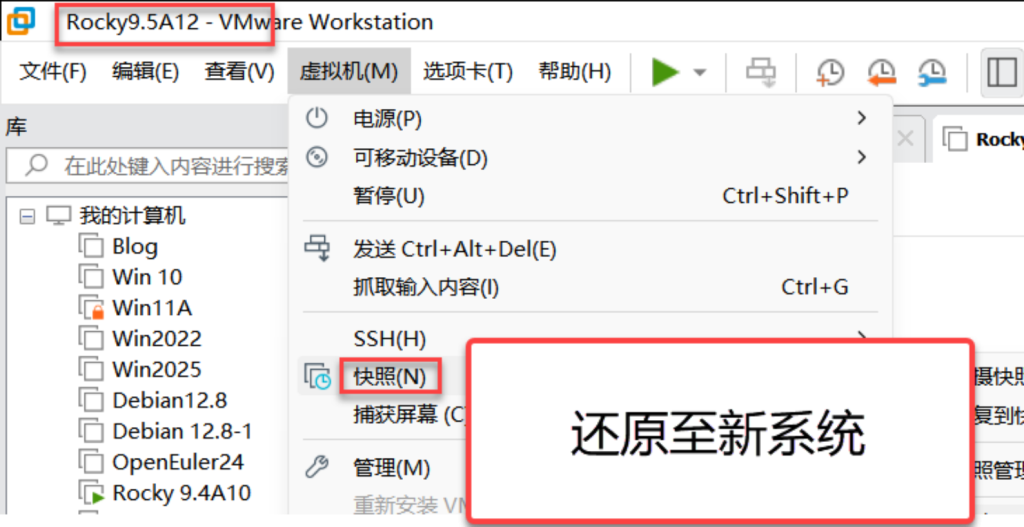
4.1 开启win2025虚拟机

4.2 设置win2025 IP地址

4.3 关闭防火墙

4.4 win2025重新命名

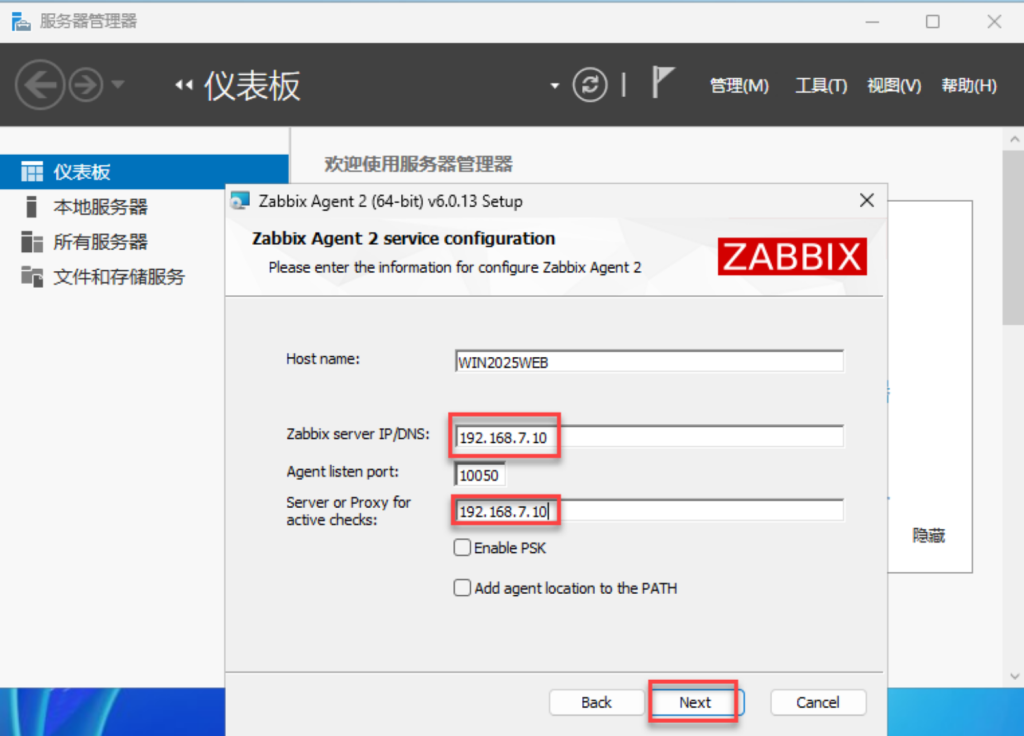
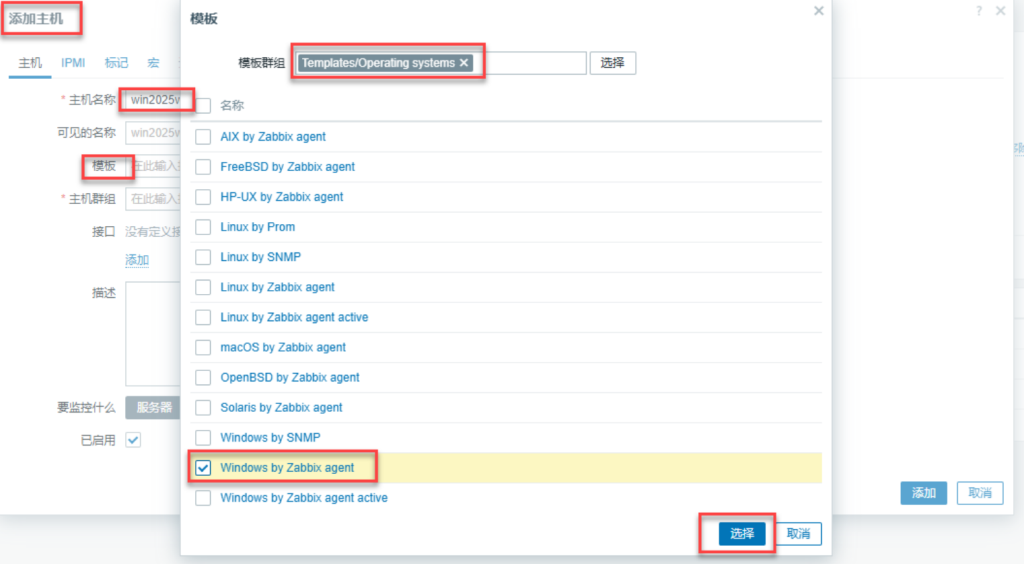
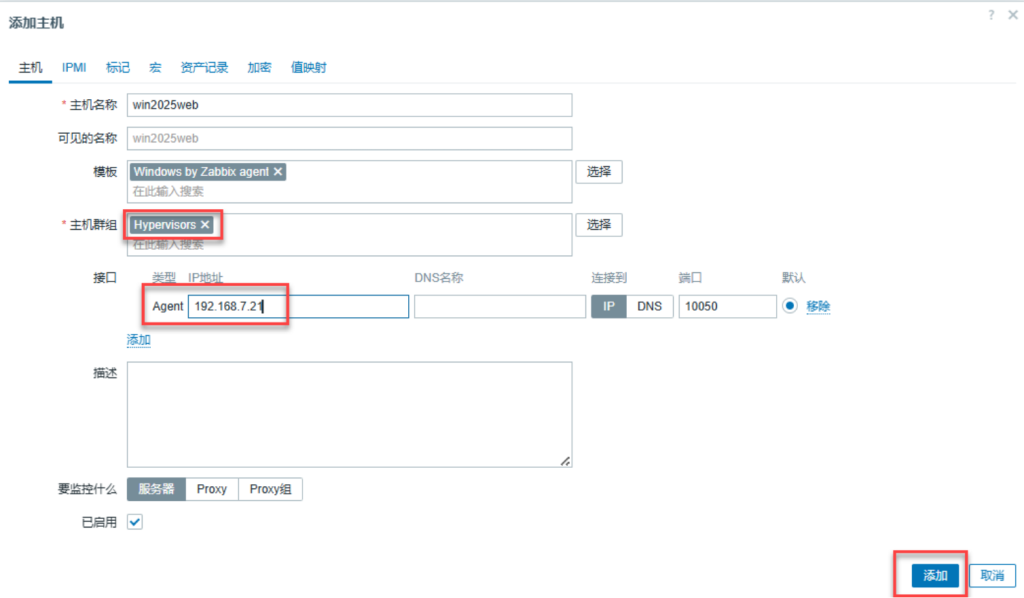
4.4 在win2025上安装winsdows版zabbix-agent


五、补充知识
实验:安装和配置监控服务器zabbix7.0LTS
zabbbix 192.168.7.10
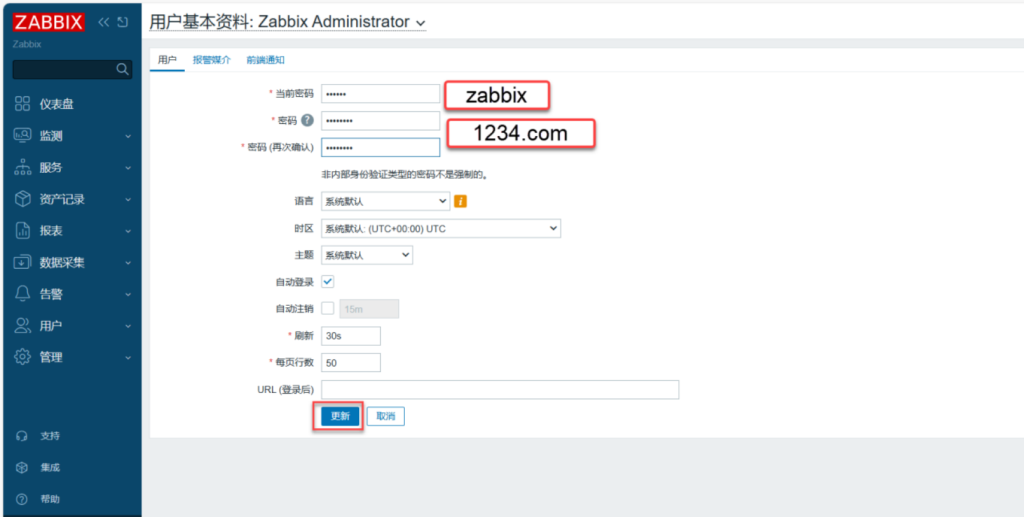
用户名: Admin
密码: zabbix
Proceed with installing zabbix repository.
# rpm -Uvh https://repo.zabbix.com/zabbix/7.0/rocky/9/x86_64/zabbix-release-latest-7.0.el9.noarch.rpm
# dnf clean all
b. Install Zabbix server, frontend, agent2
# dnf install zabbix-server-mysql zabbix-web-mysql zabbix-apache-conf zabbix-sql-scripts zabbix-selinux-policy zabbix-agent2
c. Install Zabbix agent 2 plugins
Documentation
You may want to install Zabbix agent 2 plugins.
# dnf install zabbix-agent2-plugin-mongodb zabbix-agent2-plugin-mssql zabbix-agent2-plugin-postgresql
d. Create initial database
Documentation
Make sure you have database server up and running.
Run the following on your database host.
# mysql -uroot -p
password
mysql> create database zabbix character set utf8mb4 collate utf8mb4_bin;
mysql> create user zabbix@localhost identified by ‘password’;
mysql> grant all privileges on zabbix.* to zabbix@localhost;
mysql> set global log_bin_trust_function_creators = 1;
mysql> quit;
On Zabbix server host import initial schema and data. You will be prompted to enter your newly created password.
CREATE DATABASE zabbix CHARACTER SET utf8mb4 COLLATE utf8mb4_bin; 的作用是创建一个使用 utf8mb4 字符集和 utf8mb4_bin 排序规则的 Zabbix 数据库。
set global log_bin_trust_function_creators = 1; 的作用是放宽 MySQL 对存储函数和触发器创建的安全限制,允许在启用二进制日志(binlog)的情况下创建或修改未明确指定安全特性的函数。
将 log_bin_trust_function_creators 设为 0 是 MySQL 的安全基线配置,适用于需严格保障主从数据一致性的生产环境。
# zcat /usr/share/zabbix-sql-scripts/mysql/server.sql.gz | mysql –default-character-set=utf8mb4 -uzabbix -p zabbix
Disable log_bin_trust_function_creators option after importing database schema.
# mysql -uroot -p
password
mysql> set global log_bin_trust_function_creators = 0;
mysql> quit;
e. Configure the database for Zabbix server
Edit file /etc/zabbix/zabbix_server.conf
DBPassword=password
f. Start Zabbix server and agent processes
Start Zabbix server and agent processes and make it start at system boot.
# systemctl restart zabbix-server zabbix-agent2 httpd php-fpm
# systemctl enable zabbix-server zabbix-agent2 httpd php-fpm
g. Open Zabbix UI web page
The default URL for Zabbix UI when using Apache web server is http://host/zabbix
如果web是Apache,则访问的地址是:
http://192.168.7.10:8080/zabbix/
1.监控windows server 2019
192.168.7.21
2.解决中文乱码问题
3.监控Linux服务器
192.168.7.11
4.监控Apache
http://192.168.7.11/server-status?auto
ab的安装
快速安装 yum -y install httpd-tools
ab -n 8 -c 8 http://192.168.7.11:80//index.html?app=app&c=seckill&a=addQsec&gid=1&type=redis
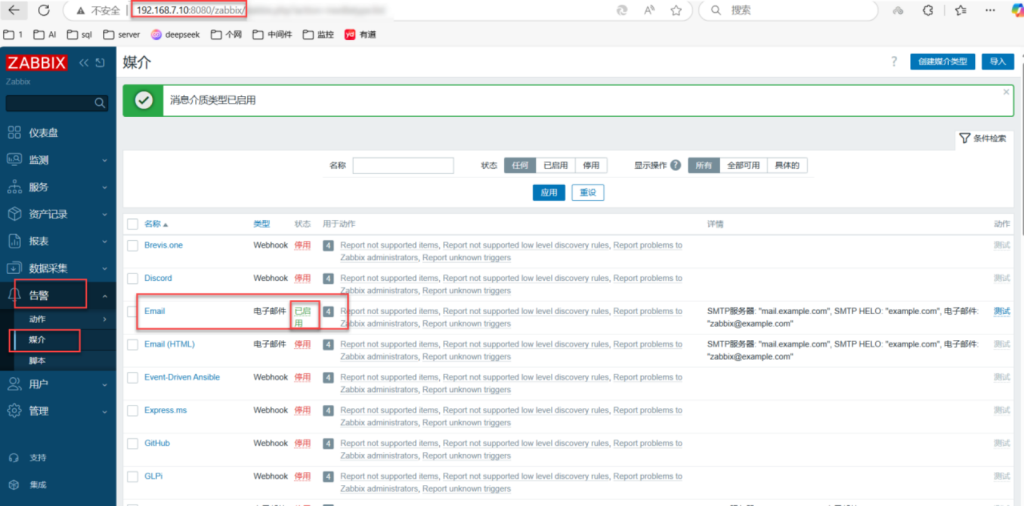
email报警
告警—–》 媒介——》 开启Email
5.监控数据库Mariadb
192.168.7.12
1)创建数据库监控账号
Zabbix 监控 MariaDB 数据库的核心指标可分为以下几大类,涵盖性能、资源利用、连接管理及主从复制等关键维度:
—
### 一、**查询性能与吞吐量**
1. **查询吞吐量**
– **Com_select/insert/update/delete**:每秒执行的 SELECT、INSERT、UPDATE、DELETE 操作次数,反映数据库读写压力。
– **Questions**:总查询量,用于监控查询量的骤变(如骤降可能预示故障)。
– **Slow_queries**:慢查询数量,标识查询效率问题(需结合 `long_query_time` 配置分析)。
2. **执行性能**
– **Innodb_row_lock_time**:行锁等待时间,反映锁竞争情况。
– **Handler_read%**:索引利用率指标(如 `Handler_read_first` 索引扫描次数)。
—
### 二、**连接与线程管理**
1. **连接状态**
– **Threads_connected**:当前活跃连接数,需与 `max_connections` 对比避免超限。
– **Aborted_connects**:失败的连接尝试次数,排查网络或权限问题。
– **Max_used_connections**:历史最大并发连接数,指导资源扩容规划。
2. **线程效率**
– **Threads_running**:正在执行的线程数,反映瞬时负载。
– **Threads_created**:累计创建的线程数,监控线程池健康度。
—
### 三、**缓冲池与存储引擎**
1. **InnoDB 缓冲池**
– **Innodb_buffer_pool_pages_free**:空闲页数量,评估缓存利用率。
– **Innodb_buffer_pool_reads**:磁盘读取次数,若高则需增大缓冲池。
– **Innodb_buffer_pool_hit_rate**:缓存命中率(需计算:`(1 – Innodb_buffer_pool_reads / Innodb_buffer_pool_read_requests) * 100`)。
2. **表空间与 I/O**
– **Innodb_data_read/written**:数据读写量,监控磁盘 I/O 负载。
– **Innodb_log_waits**:日志缓冲区等待次数,反映日志写入瓶颈。
—
### 四、**主从复制状态**
1. **复制延迟与健康度**
– **Seconds_Behind_Master**:主从延迟秒数,直接反映复制健康状况。
– **Slave_IO_Running/Slave_SQL_Running**:I/O 线程和 SQL 线程运行状态(0/1 表示异常/正常)。
– **Last_IO_Error/Last_SQL_Error**:记录复制链路的错误信息。
—
### 五、**资源利用率**
1. **CPU 与内存**
– **CPU 空闲时间(CPU Idle)**:通过自定义脚本监控空闲率(如 `iostat` 提取 `%idle`)。
– **内存使用率**:监控 `Mem_used` 和 `Mem_free` 百分比,避免 OOM。
2. **磁盘与网络**
– **磁盘空间利用率**:监控数据目录、日志目录的剩余空间。
– **网络流量**:通过 Zabbix 内置项(如 `net.if.in/out`)监控数据库端口的流量。
—
### 六、**自定义指标与扩展**
1. **状态变量与性能计数器**
通过 `SHOW GLOBAL STATUS` 和 `SHOW VARIABLES` 获取自定义指标(如 `Qcache_hits` 查询缓存命中次数)。
2. **脚本化监控**
可编写 Shell/Python 脚本采集业务相关指标(如事务吞吐量、锁等待时间),并通过 Zabbix Agent 的 `UserParameter` 集成。
—
### 配置建议
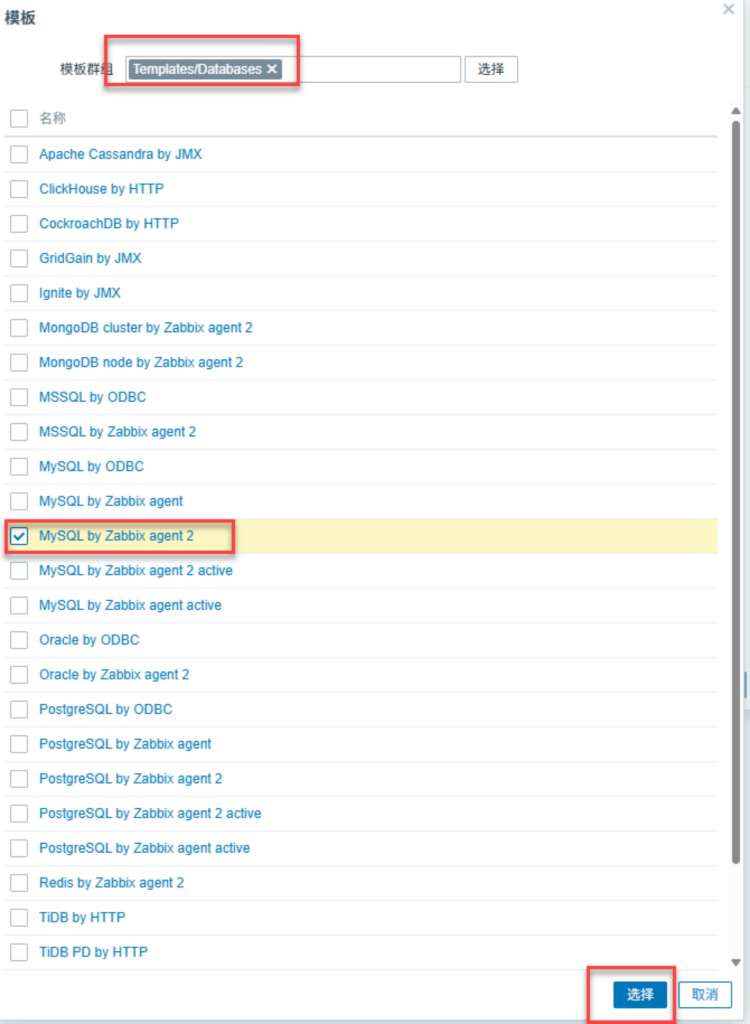
– **模板复用**:使用 Zabbix 官方或社区提供的 **MySQL/MariaDB 监控模板**(如 “MySQL by Zabbix agent”),快速部署基础监控。
– **告警阈值**:针对关键指标(如 `Slow_queries > 0`、`Slave_SQL_Running = 0`)设置触发器,结合邮件、Webhook 告警。
– **性能基线**:通过 Zabbix 的历史数据生成性能基线,辅助容量规划。
通过以上指标组合,可全面掌握 MariaDB 的运行状态,实现从基础资源到复杂业务逻辑的全方位监控。
===================================================
创建一个名为zabbix的数据库,指定字符集为utf8mb4,校对规则为utf8mb4_bin
mysql> set global log_bin_trust_function_creators = 1; 的作用是 临时关闭 MySQL 对存储函数/触发器创建的安全检查,允许在启用二进制日志(binlog)的情况下创建未明确声明 DETERMINISTIC、NO SQL 或 READS SQL DATA 特性的函数