知识点导引:







实验1:kill命令杀死服务的端口

[root@server10 ~]# dnf -y install httpd 安装阿帕奇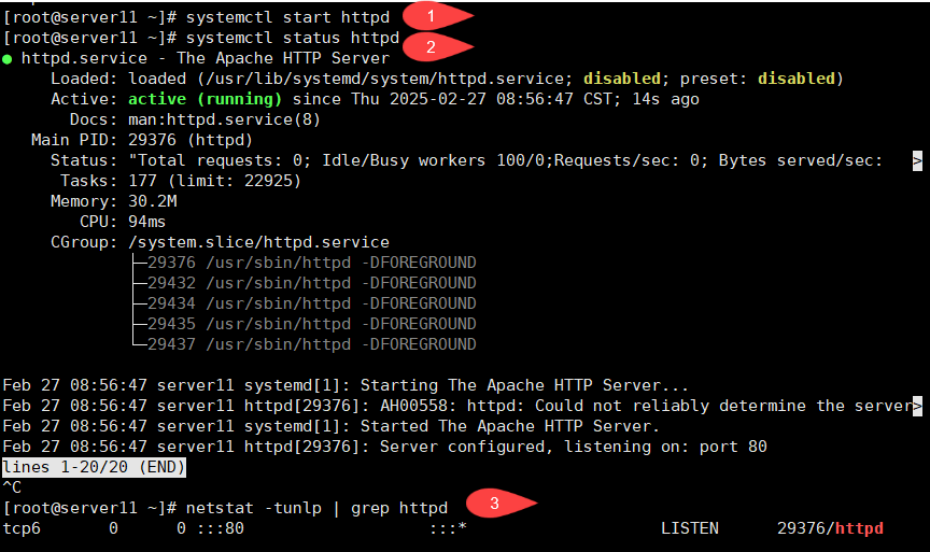
[root@server10 ~]# systemctl start httpd		启动阿帕奇
[root@server10 ~]#
[root@server10 ~]# systemctl status httpd	查看阿帕奇状态
● httpd.service - The Apache HTTP Server
     Loaded: loaded (/usr/lib/systemd/system/httpd.service; disabled; preset: disabled)
     Active: active (running) since Thu 2025-02-27 08:56:27 CST; 5s ago			Active: active (running) 活跃,正在运行


[root@server10 ~]# netstat -tunlp | grep httpd	查看阿帕奇的端口
tcp6 0 0 :::80 :::* LISTEN 15245/httpd 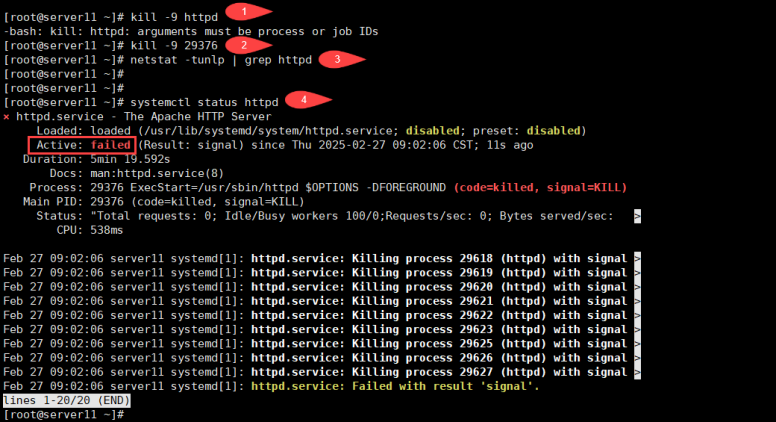
[root@server10 ~]# kill -9 15245		杀掉阿帕奇的进程号,号:15245
[root@server10 ~]#
[root@server10 ~]# netstat -tunlp | grep httpd	查看阿帕奇的端口
[root@server10 ~]#						(没有了,被杀死了)
[root@server10 ~]# systemctl status httpd		查看阿帕奇的状态
× httpd.service - The Apache HTTP Server
     Loaded: loaded (/usr/lib/systemd/system/httpd.service; disabled; preset: disabled)
     Active: failed (Result: signal) since Thu 2025-02-27 09:02:00 CST; 13s ago   Active: failed失败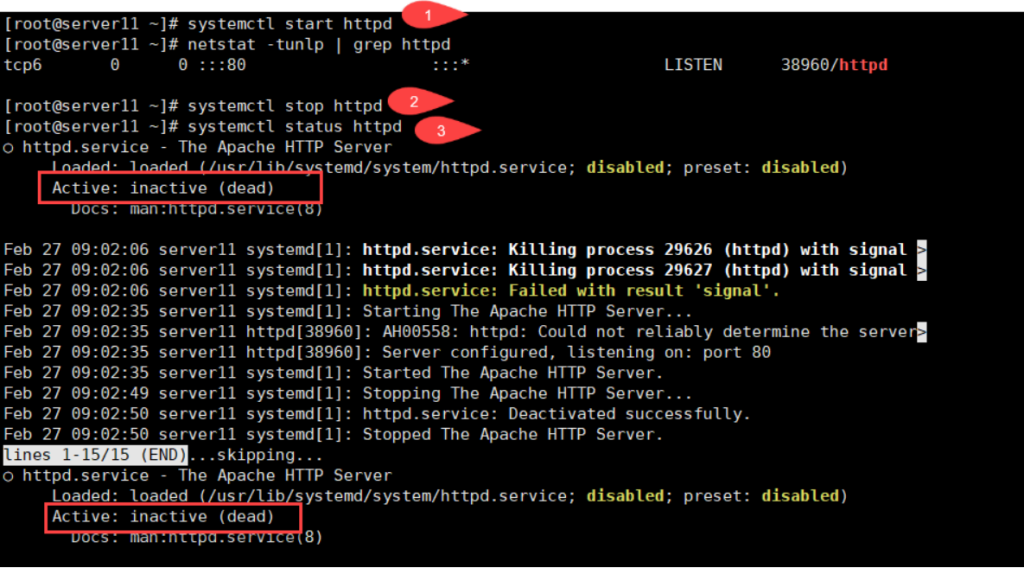
[root@server10 ~]# systemctl start httpd		启动阿帕奇
[root@server10 ~]# netstat -tunlp | grep httpd 	查看阿帕奇的端口号
tcp6       0      0 :::80                   :::*                    LISTEN      38946/httpd     80端口号
[root@server10 ~]# systemctl stop httpd		关闭阿帕奇
[root@server10 ~]#
[root@server10 ~]# systemctl status httpd	查看阿帕奇的状态
○ httpd.service - The Apache HTTP Server
     Loaded: loaded (/usr/lib/systemd/system/httpd.service; disabled; preset: disabled)
     Active: inactive (dead)                                      inactive (dead)不活跃的
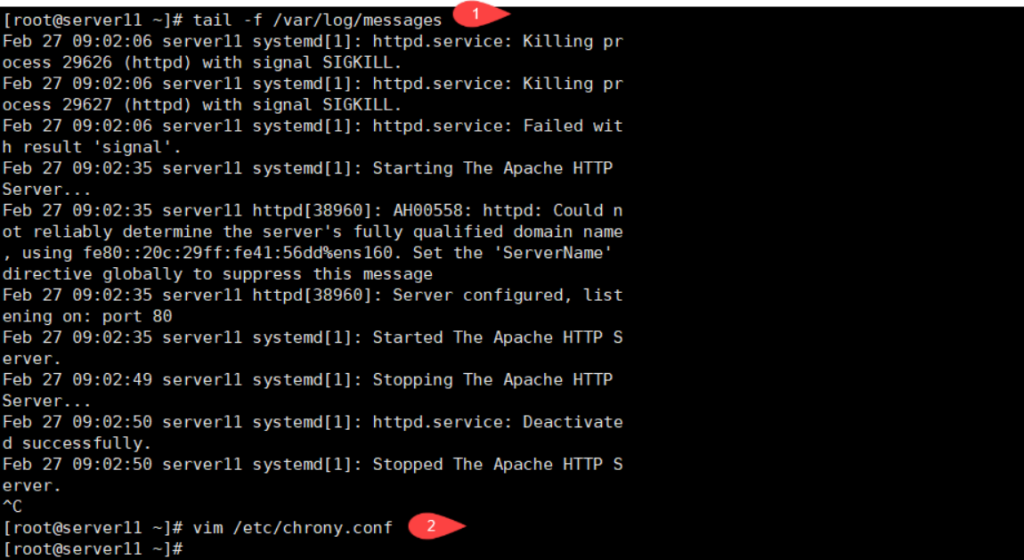
[root@server10 ~]# tail -f /var/log/messages 动态查看日志信息(主要查看Linux出错信息)
Feb 27 09:02:00 server10 systemd[1]: httpd.service: Killing process 15540 (httpd) with signal SIGKILL.
Feb 27 09:02:00 server10 systemd[1]: httpd.service: Killing process 15541 (httpd) with signal SIGKILL.
Feb 27 09:02:00 server10 systemd[1]: httpd.service: Failed with result 'signal'.
Feb 27 09:02:32 server10 systemd[1]: Starting The Apache HTTP Server...
Feb 27 09:02:32 server10 httpd[38946]: AH00558: httpd: Could not reliably determine the server's fully qualified domain name, using fe80::20c:29ff:fe74:811f%ens160. Set the 'ServerName' directive globally to suppress this message
Feb 27 09:02:32 server10 httpd[38946]: Server configured, listening on: port 80
Feb 27 09:02:32 server10 systemd[1]: Started The Apache HTTP Server.
Feb 27 09:02:44 server10 systemd[1]: Stopping The Apache HTTP Server...
Feb 27 09:02:45 server10 systemd[1]: httpd.service: Deactivated successfully.
Feb 27 09:02:45 server10 systemd[1]: Stopped The Apache HTTP Server.
[root@server10 ~]# vim /etc/chrony.conf 编辑时间同步配置文件实验2:计划任务crontab
每隔1小时同步时间和日期

#pool 2.rocky.pool.ntp.org iburst					注释掉原来时间同步地址
pool ntp.aliyun.com iburst							同步阿里云的地址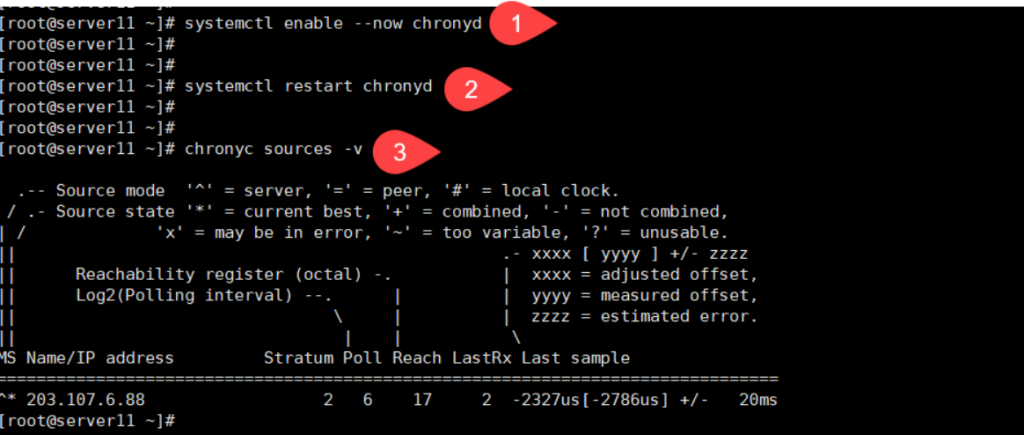
[root@server10 ~]# systemctl enable --now chronyd	启动时间同步,并设置开机启动
Created symlink /etc/systemd/system/multi-user.target.wants/chronyd.service → /usr/lib/systemd/system/chronyd.service.
[root@server10 ~]#
[root@server10 ~]# chronyc sources -v				运行时间同步
.-- Source mode  '^' = server, '=' = peer, '#' = local clock.
 / .- Source state '*' = current best, '+' = combined, '-' = not combined,
| /             'x' = may be in error, '~' = too variable, '?' = unusable.
||                                                 .- xxxx [ yyyy ] +/- zzzz
||      Reachability register (octal) -.           |  xxxx = adjusted offset,
||      Log2(Polling interval) --.      |          |  yyyy = measured offset,
||                                \     |          |  zzzz = estimated error.
||                                 |    |           \
MS Name/IP address         Stratum Poll Reach LastRx Last sample
===============================================================================
^* 203.107.6.88 2 6 17 1 +1418us[+1078us] +/- 14ms 时间同步成功会显示IP地址:203.107.6.88 
[root@server10 ~]# date							查看时间和日期
Thu Feb 27 09:09:46 AM CST 2025
[root@server10 ~]#
[root@server10 ~]# clock -w						将时间和日期保存到系统中
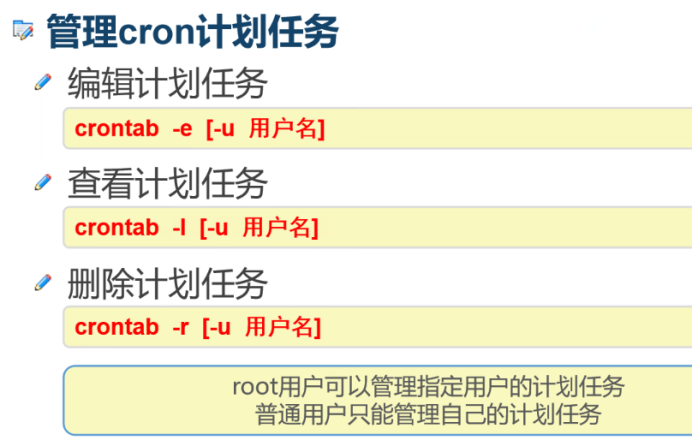
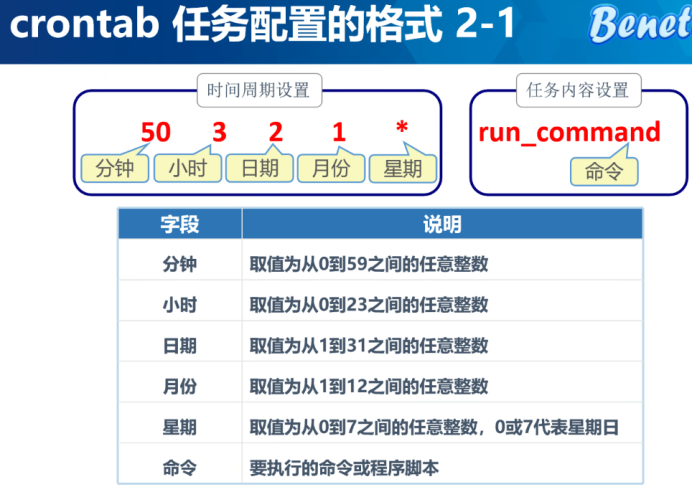
[root@server10 ~]# crontab -e 设置计划任务
* */1 * * * /usr/bin/chronyc makestep > /dev/null 2>&1	每隔1小时执行时间同步命令,执行过程中不输出任何信息
* */1 * * * 分钟 小时 日 月 星期
实验3:修改网络配置文件
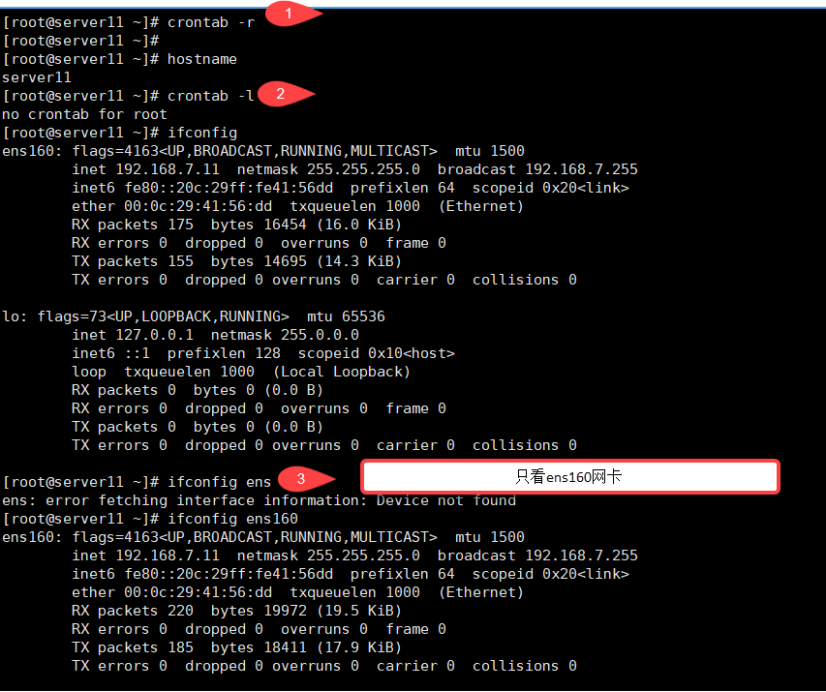
[root@server10 ~]# crontab -r						删除计划任务
[root@server10 ~]#
[root@server10 ~]# crontab -l						限时任务计划列表
no crontab for root

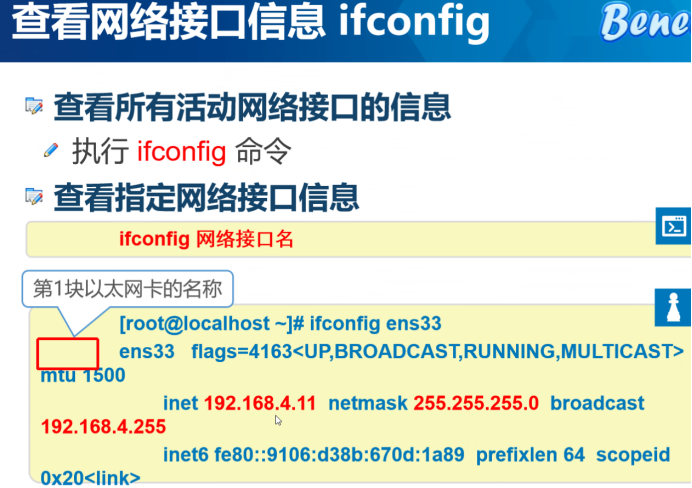
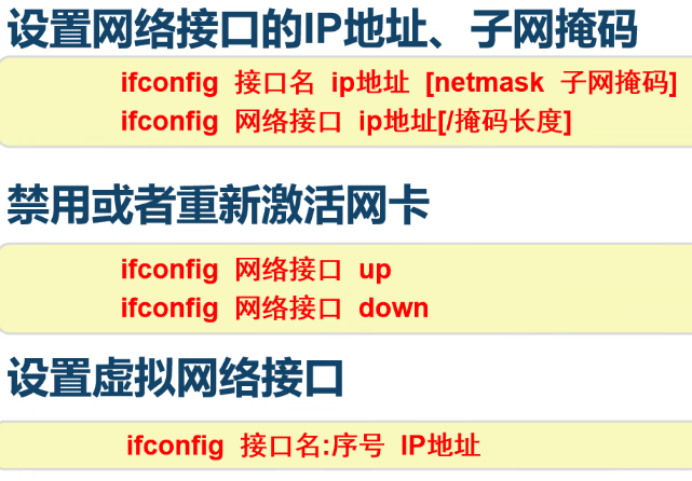
[root@server10 ~]# ifconfig						查看IP地址
ens160: flags=4163<UP,BROADCAST,RUNNING,MULTICAST>  mtu 1500
        inet 192.168.7.10  netmask 255.255.255.0  broadcast 192.168.7.255
        inet6 fe80::20c:29ff:fe74:811f  prefixlen 64  scopeid 0x20<link>
        ether 00:0c:29:74:81:1f  txqueuelen 1000  (Ethernet)
        RX packets 11300  bytes 14421280 (13.7 MiB)
        RX errors 0  dropped 0  overruns 0  frame 0
        TX packets 5734  bytes 431992 (421.8 KiB)
        TX errors 0  dropped 0 overruns 0  carrier 0  collisions 0

lo: flags=73<UP,LOOPBACK,RUNNING>  mtu 65536
        inet 127.0.0.1  netmask 255.0.0.0
        inet6 ::1  prefixlen 128  scopeid 0x10<host>
        loop  txqueuelen 1000  (Local Loopback)
        RX packets 72  bytes 6120 (5.9 KiB)
        RX errors 0  dropped 0  overruns 0  frame 0
        TX packets 72  bytes 6120 (5.9 KiB)
        TX errors 0  dropped 0 overruns 0  carrier 0  collisions 0

[root@server10 ~]# ifconfig ens160					查看ens160网卡信息
ens160: flags=4163<UP,BROADCAST,RUNNING,MULTICAST>  mtu 1500
        inet 192.168.7.10  netmask 255.255.255.0  broadcast 192.168.7.255
        inet6 fe80::20c:29ff:fe74:811f  prefixlen 64  scopeid 0x20<link>
        ether 00:0c:29:74:81:1f  txqueuelen 1000  (Ethernet)
        RX packets 11346  bytes 14424884 (13.7 MiB)
        RX errors 0  dropped 0  overruns 0  frame 0
        TX packets 5761  bytes 435366 (425.1 KiB)
        TX errors 0  dropped 0 overruns 0  carrier 0  collisions 0
[root@server10 ~]#
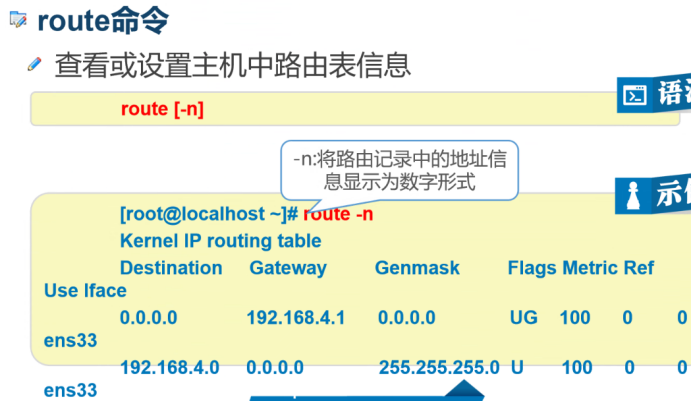
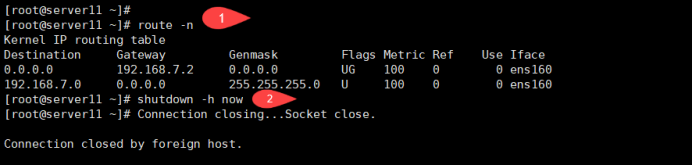
[root@server10 ~]# route -n				查看路由信息( Gateway查看网关地址:192.168.7.2 )
Kernel IP routing table
Destination     Gateway         Genmask         Flags Metric Ref    Use Iface
0.0.0.0         192.168.7.2     0.0.0.0         UG    100    0        0 ens160
192.168.7.0     0.0.0.0         255.255.255.0   U     100    0        0 ens160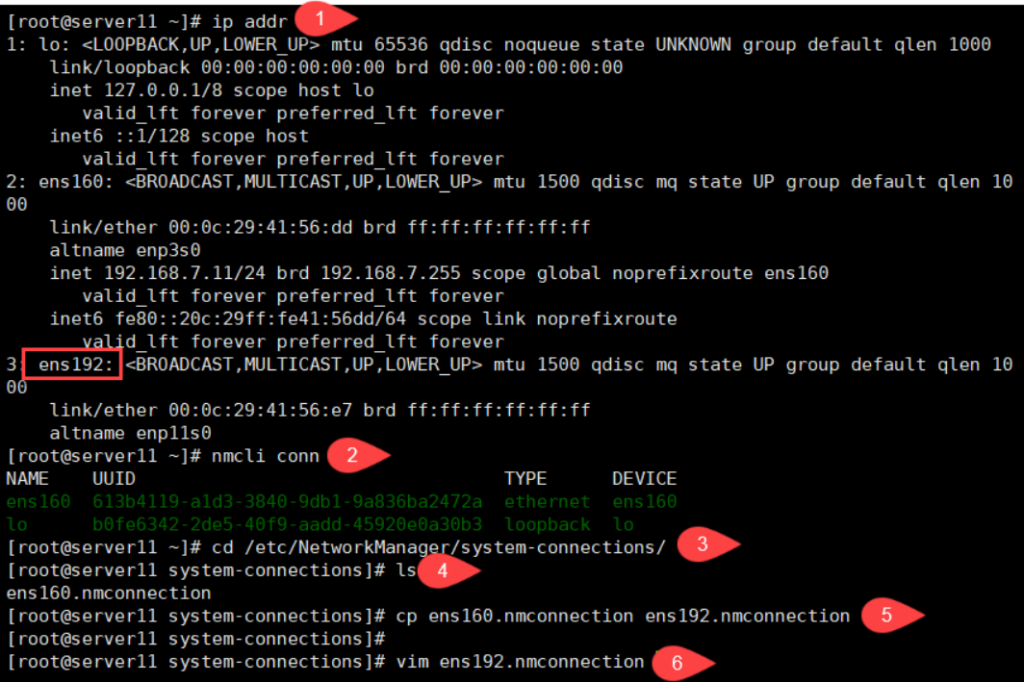
[root@server10 ~]# ip addr					查看IP地址(第二块网卡的名称:ens192)
1: lo: <LOOPBACK,UP,LOWER_UP> mtu 65536 qdisc noqueue state UNKNOWN group default qlen 1000
    link/loopback 00:00:00:00:00:00 brd 00:00:00:00:00:00
    inet 127.0.0.1/8 scope host lo
       valid_lft forever preferred_lft forever
    inet6 ::1/128 scope host
       valid_lft forever preferred_lft forever
2: ens160: <BROADCAST,MULTICAST,UP,LOWER_UP> mtu 1500 qdisc mq state UP group default qlen 1000
    link/ether 00:0c:29:74:81:1f brd ff:ff:ff:ff:ff:ff
    altname enp3s0
    inet 192.168.7.10/24 brd 192.168.7.255 scope global noprefixroute ens160
       valid_lft forever preferred_lft forever
    inet6 fe80::20c:29ff:fe74:811f/64 scope link noprefixroute
       valid_lft forever preferred_lft forever
3: ens192: <BROADCAST,MULTICAST,UP,LOWER_UP> mtu 1500 qdisc mq state UP group default qlen 1000
    link/ether 00:0c:29:74:81:29 brd ff:ff:ff:ff:ff:ff
    altname enp11s0
[root@server10 ~]#
[root@server10 ~]# nmcli conn 查看网络连接(只有本身地址和回环地址)
NAME    UUID                                  TYPE      DEVICE
ens160  b8ce3644-4f75-339f-8e13-67205af44138  ethernet  ens160
lo      c1f04e9b-03b0-4ffb-af4b-4d2c3f6879c5  loopback  lo
[root@server10 ~]#
[root@server10 ~]# cd /etc/NetworkManager/system-connections/		进入网卡配置文件目录
[root@server10 system-connections]# ls
ens160.nmconnection
[root@server10 system-connections]# cp ens160.nmconnection ens192.nmconnection 		将ens160网卡配置文件复制给ens192网卡配置文件
[root@server10 system-connections]#
[root@server10 system-connections]# vim ens192.nmconnection 		编辑ens192网卡配置文件(uuid改最后一个值,范围:a-f 1-9)
[connection]
id=ens192												id改成ens192
uuid=b8ce3644-4f75-339f-8e13-67205af44131
type=ethernet
autoconnect-priority=-999
interface-name=ens192  									接口名称ens192

[ethernet]

[ipv4]
address1=192.168.10.10/24   				ip 地址改成:10.10
#dns=114.114.114.114;						#dns dns注释掉
method=manual
[root@server10 system-connections]# reboot 重启

关机-还原至新系统
实验4:配置DHCP服务器
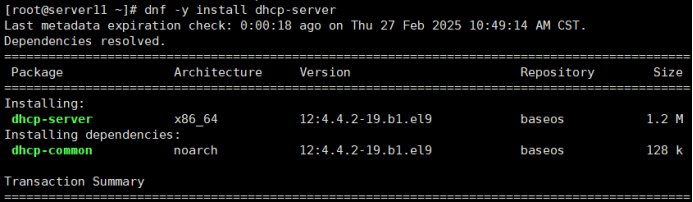
[root@server10 ~]# dnf -y install dhcp-server 安装dhcp服务器
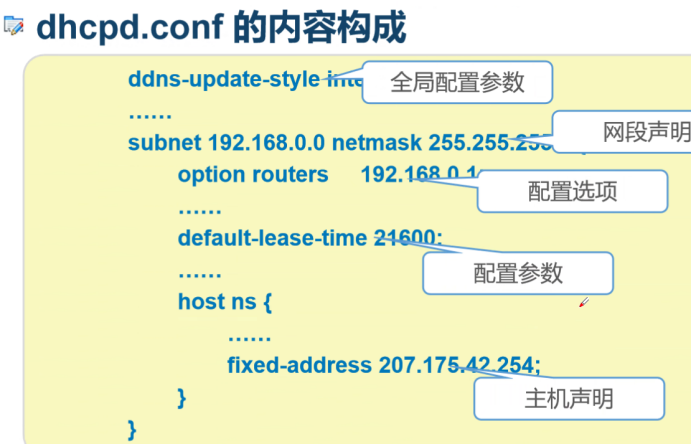
[root@server10 ~]# vim /etc/dhcp/dhcpd.conf 编辑dhcp配置文件

:r /usr/share/doc/dhcp-server/dhcpd.conf.example 读取dhcp配置文件的模板查看/usr/share/doc/dhcp-server/dhcpd.conf.example 后敲回车
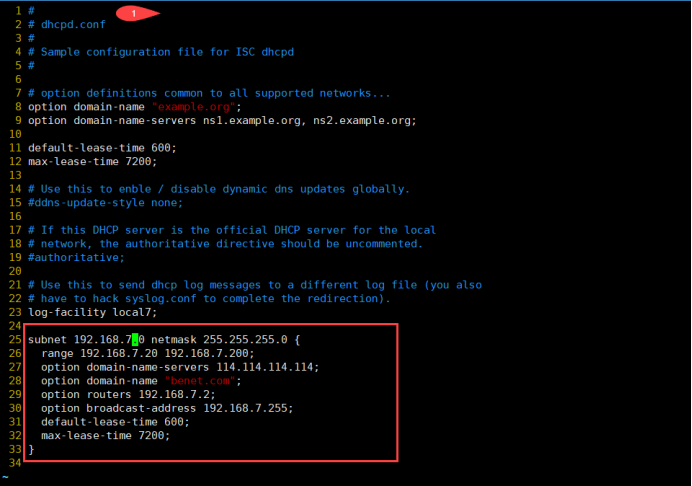
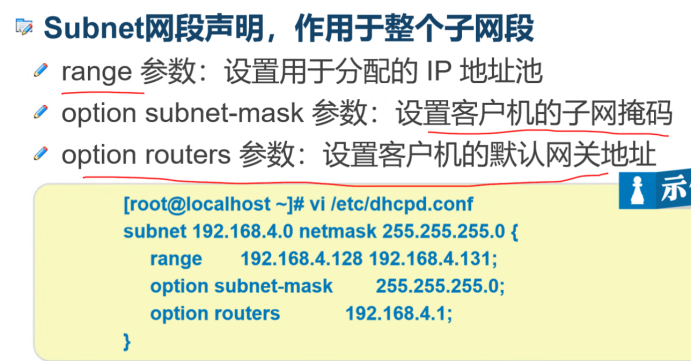
25 subnet 192.168.7.0 netmask 255.255.255.0 {					定义的网段 192.168.7.0 子网掩码255.255.255.0
 26   range 192.168.7.20 192.168.7.200;						dhcp地址分配的地址:7.20-7.200
 27   option domain-name-servers 114.114.114.114;			dns地址114
 28   option domain-name "benet.com";						定义的域名:benet.com
 29   option routers 192.168.7.2;								网关地址:192.168.7.2
 30   option broadcast-address 192.168.7.255;					广播地址:192.168.7.255
 31   default-lease-time 600;								默认租约时间:600秒
 32   max-lease-time 7200;									最大租约时间:7200秒
 33 }
systemctl enable --now dhcpd 启动dhcp并设置开机启动开启另外一台虚拟机,名称:Win11
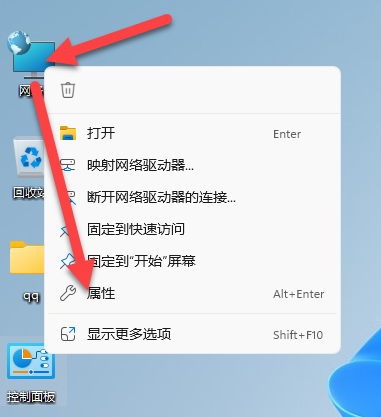


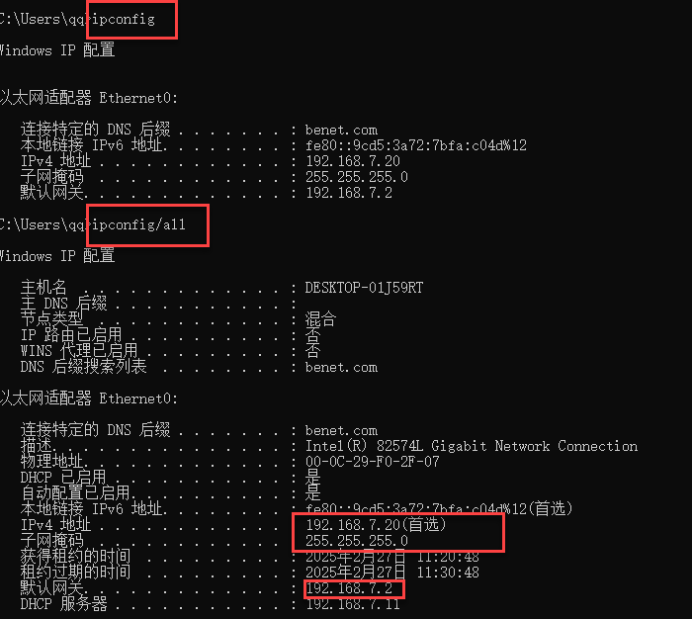
实验5:用DHCP服务器,模拟假定给公司一台打印机,设置固定IP地址
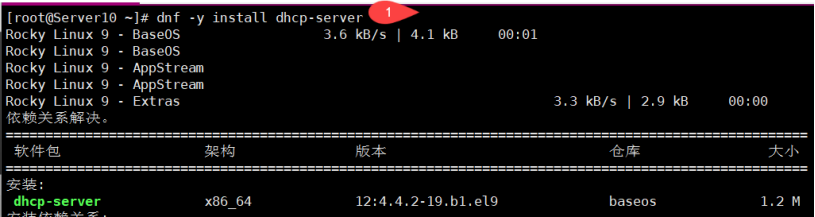
安装dhcp服务器

编辑dhcp配置文件
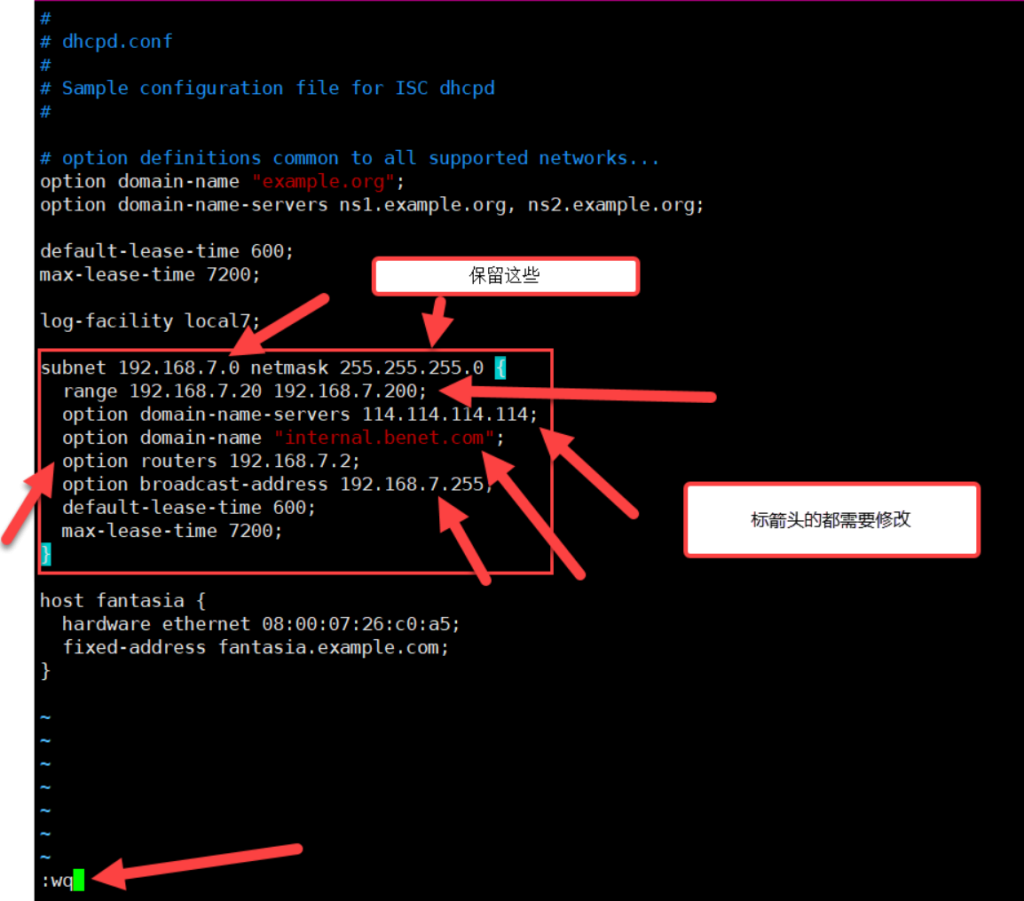
 subnet 192.168.7.0 netmask 255.255.255.0  {定义的网段 192.168.7.0 子网掩码255.255.255.0
 range 192.168.7.20 192.168.7.200;			dhcp地址分配的地址:7.20-7.200
 option domain-name-servers 114.114.114.114;	dns地址114
 option domain-name "internal.benet.com";			定义的域名:benet.com
 option routers 192.168.7.2;				网关地址:192.168.7.2
 option broadcast-address 192.168.7.255;		广播地址:192.168.7.255
 default-lease-time 600;				默认租约时间:600秒
 max-lease-time 7200;				最大租约时间:7200秒
  }
启动dhcp并设置dhcp开机启动
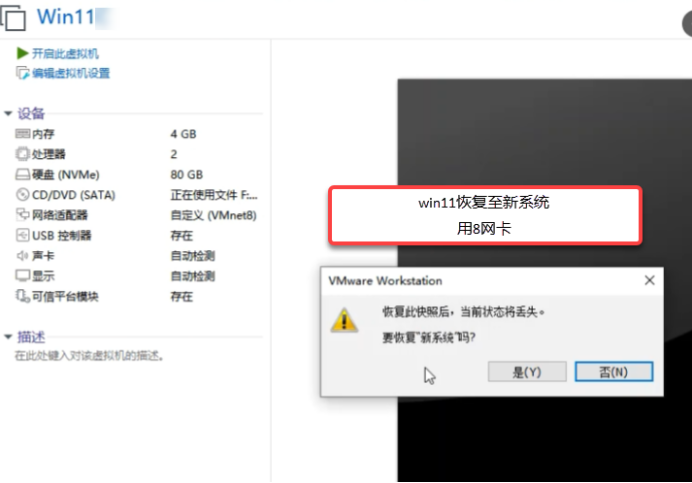
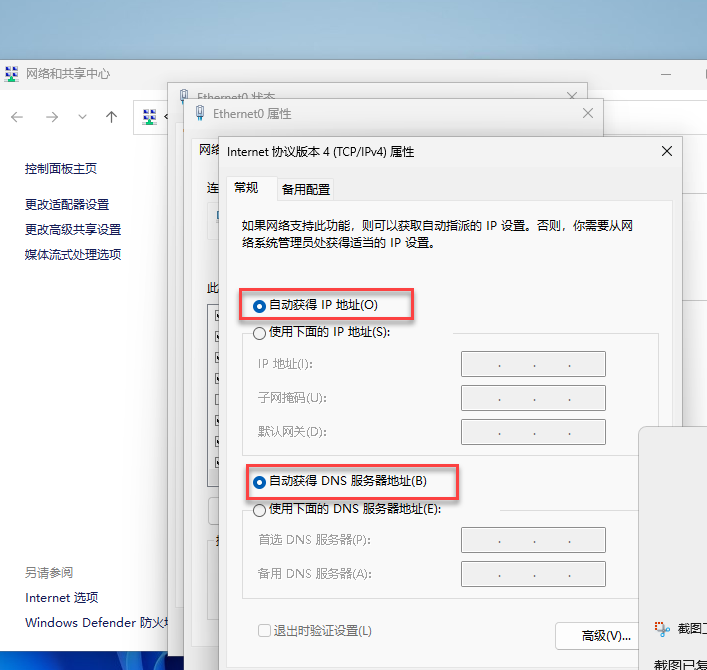
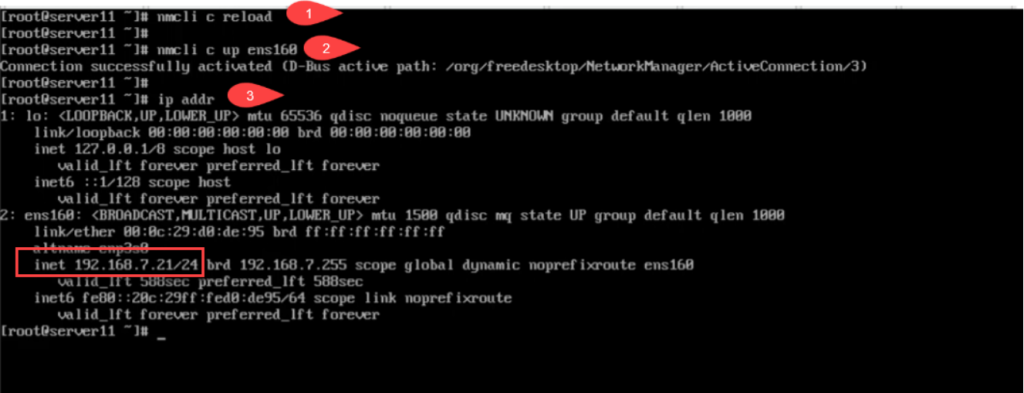
ipv4更改为自动获得IP地址
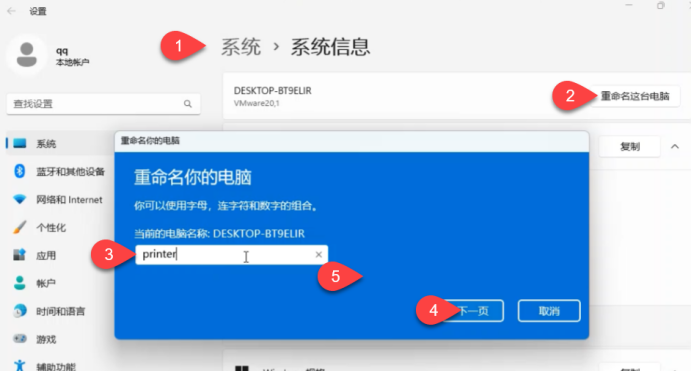
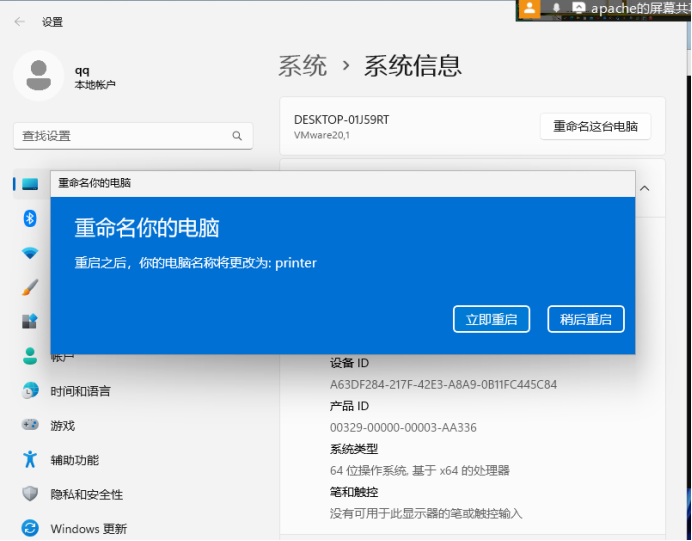
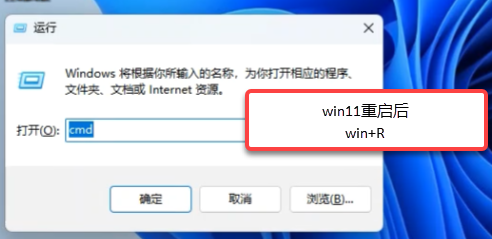


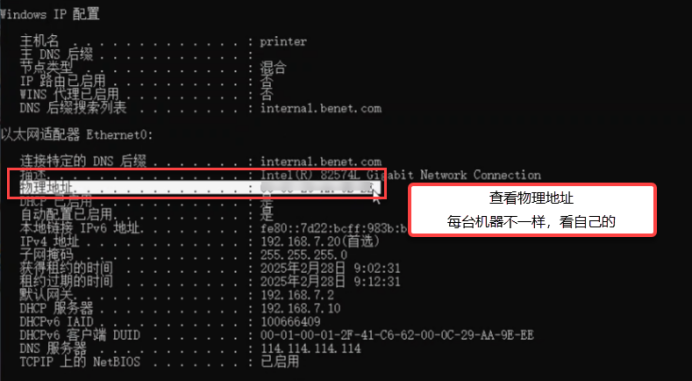

编辑dhcp配置文件
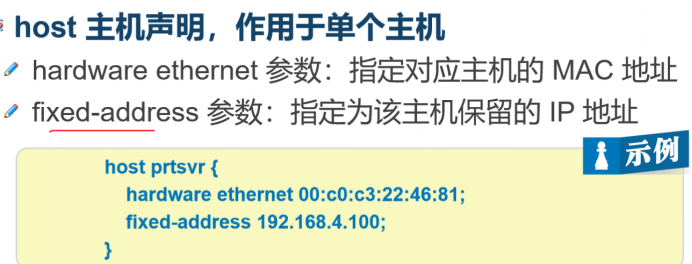
这里只修改host printer里的内容,host printer上面的内容不动,把win11虚拟机的物理地址,复制到host printer的hardware ethernet里


重启dhcp
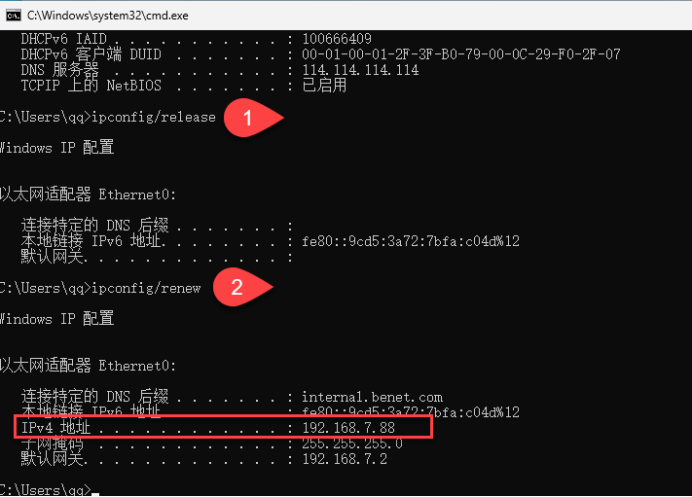
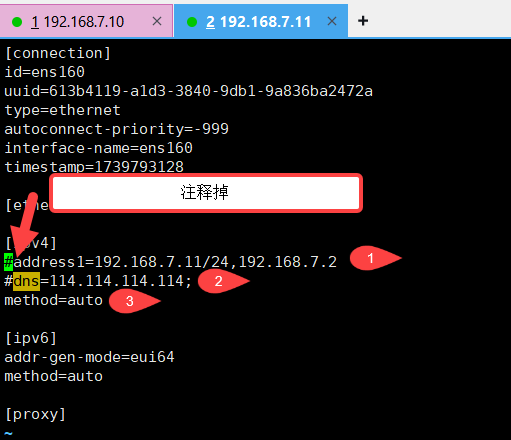
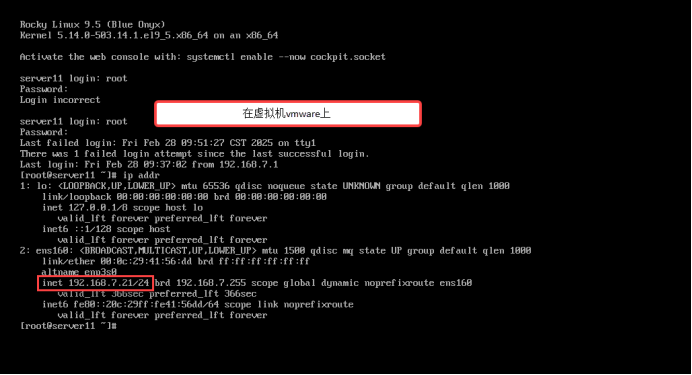
以下操作都是在VMare station下(注意不是xshell远程虚拟机上),进入网卡配置文件

还原新系统,添加一块100G硬盘